
You can register your event (party, workshop, concert or festival) in e-dancer totally free by doing click here.
Enter the details of your event with all the details and send it to e-dancer. We will review and publish it; from that moment on you will be able to be consulted by the users of our website.
Do you want to sell tickets to your event in e-dancer? See the section you have about it below, or click to access it.
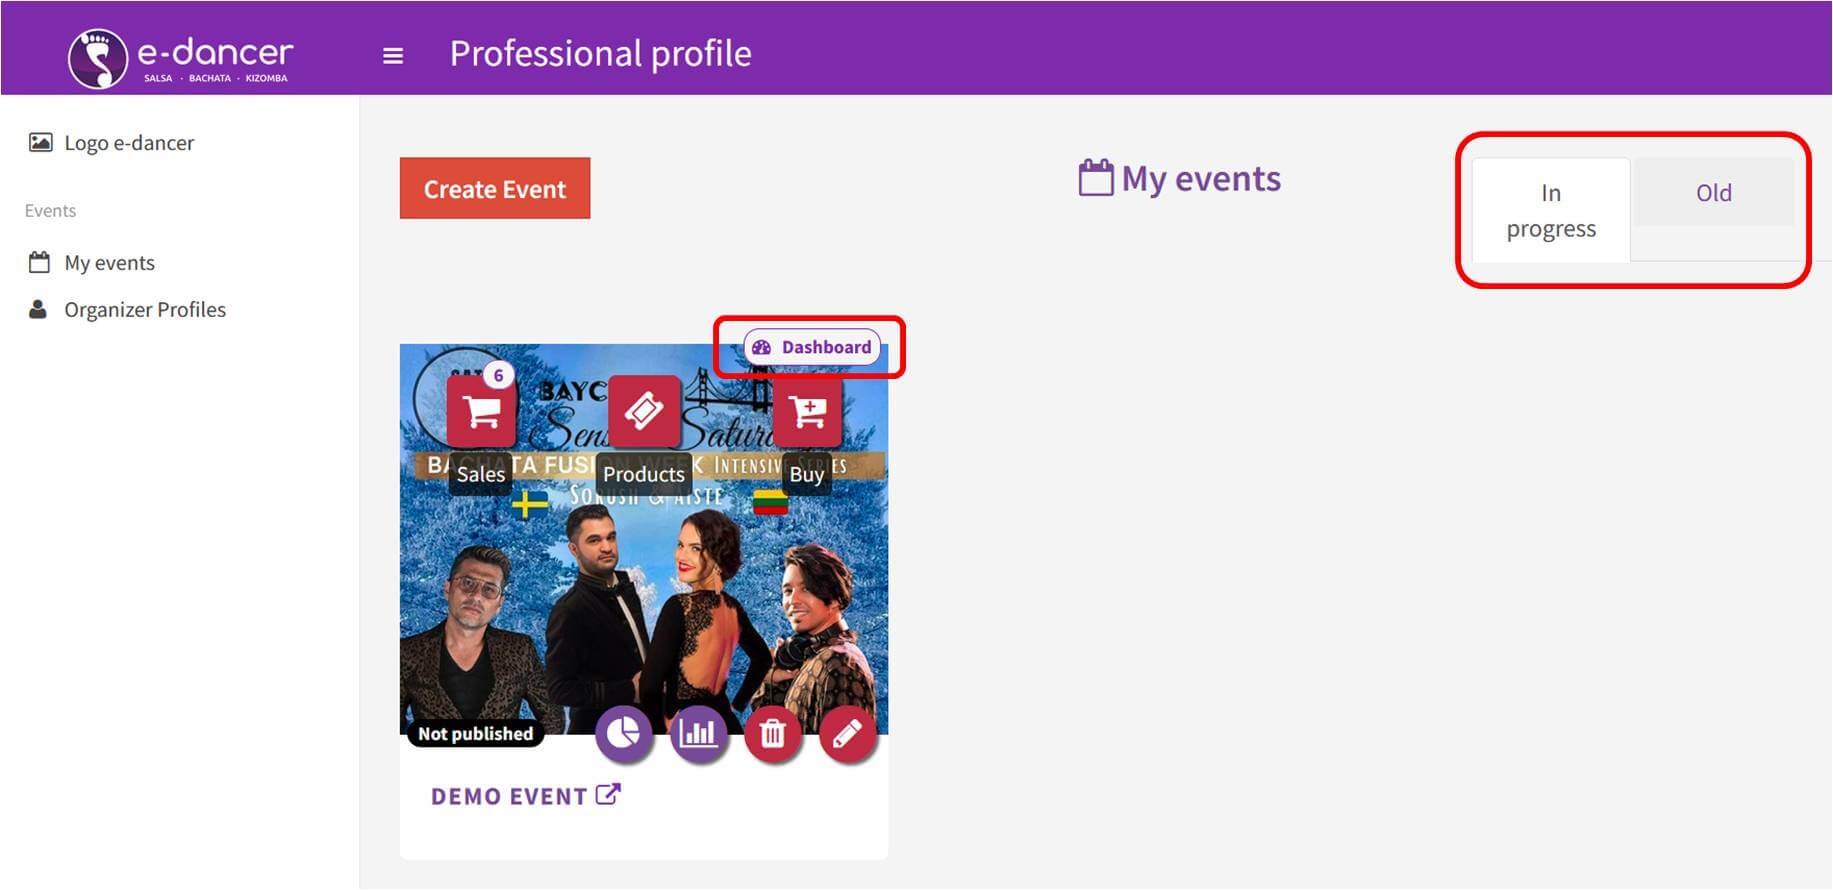
Once your event is published, you will be able to manage all aspects of it from your private organizer area . Do click here or on the "My events" option of the "My profile" menu to access.
In your area you will have all your ongoing and past events in which you are an organizer and / or commercial. For those in which you are an organizer, you will be able to access its administration panel, in which you will have all the management options, as well as information regarding the number of user visits and ticket sales (if the event is sold through e-dancer ).
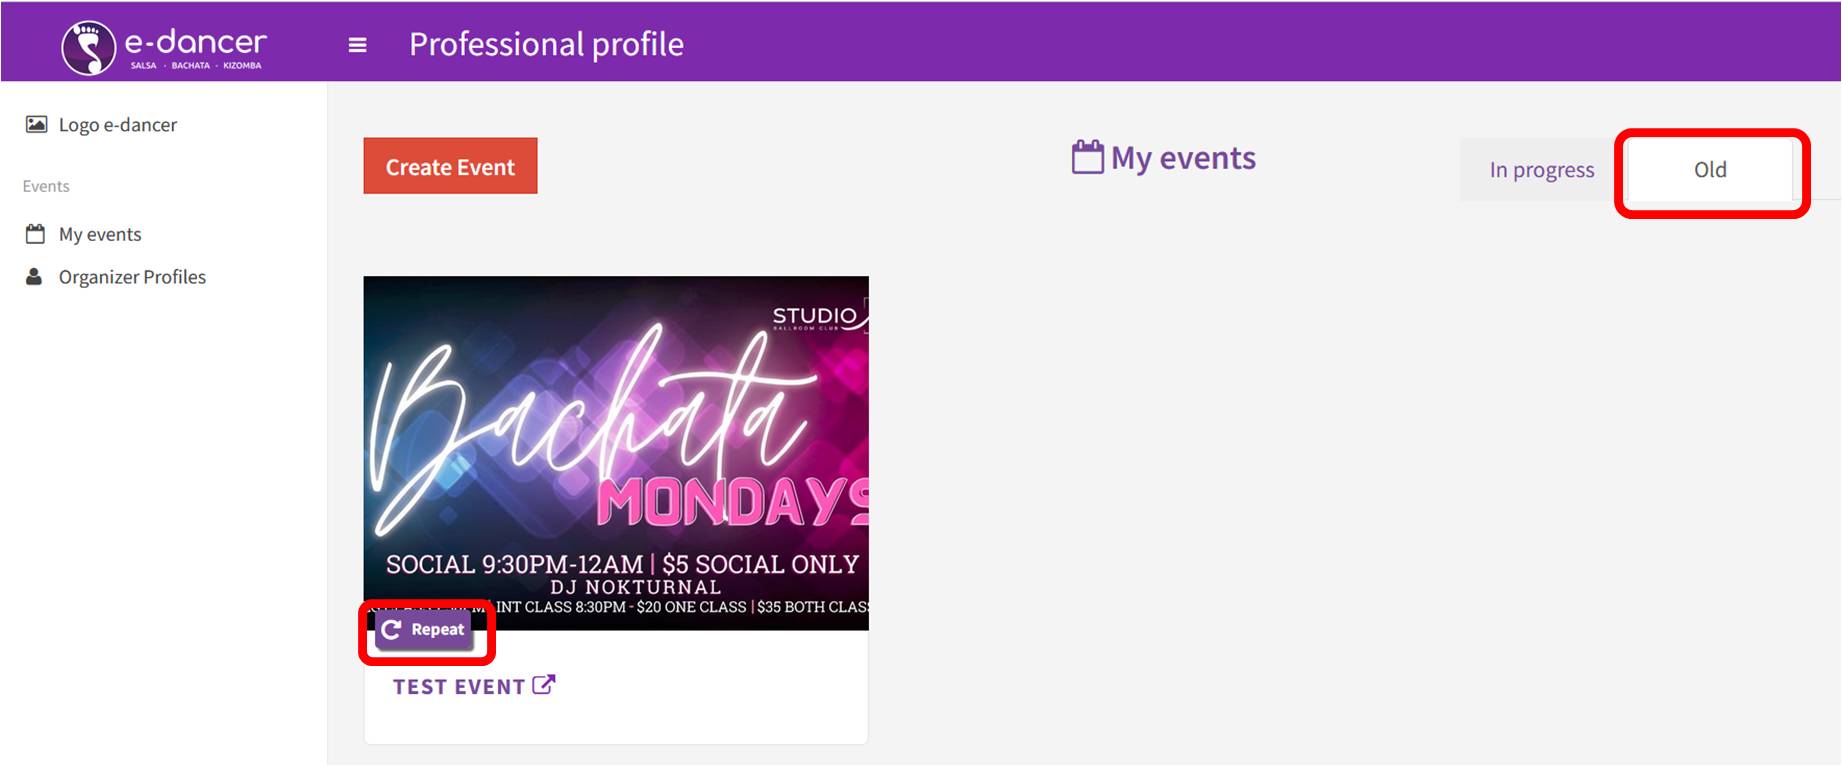
If you have an event in e-dancer that has already taken place, you can create a new event as a copy of it. This will be very useful when you want to create a new edition of a past event.
To create the new event in this way, you must access your events and click on the "Old" button. With this you will see the list of your events already carried out. In it, find the event you want to copy and click on the "Repeat" button.
The editing screen of the new event will open containing the information of the event from which it is copied, except the start and end dates. Update the necessary information for the new event and send it to e-dancer. As with any new event, we will review and publish it.
Whether you sell your event tickets in e-dancer or not, we offer you different ways to make it more visible and promote it among our community.
In the control panel of your event has a "Marketing" section. In it you have different options to advertise your event:
click here to see the e-dancer rate for the different marketing services for your event.

At the same time you register your event you can indicate that you want to sell the tickets in e-dancer. However, you can edit it at any time (even already created and published) to start ticket sales. To do this, just edit the event from your control panel and update the ticket sales section.
Do click here to see the e-dancer rate for ticket sales, as well as all the services we can offer you .
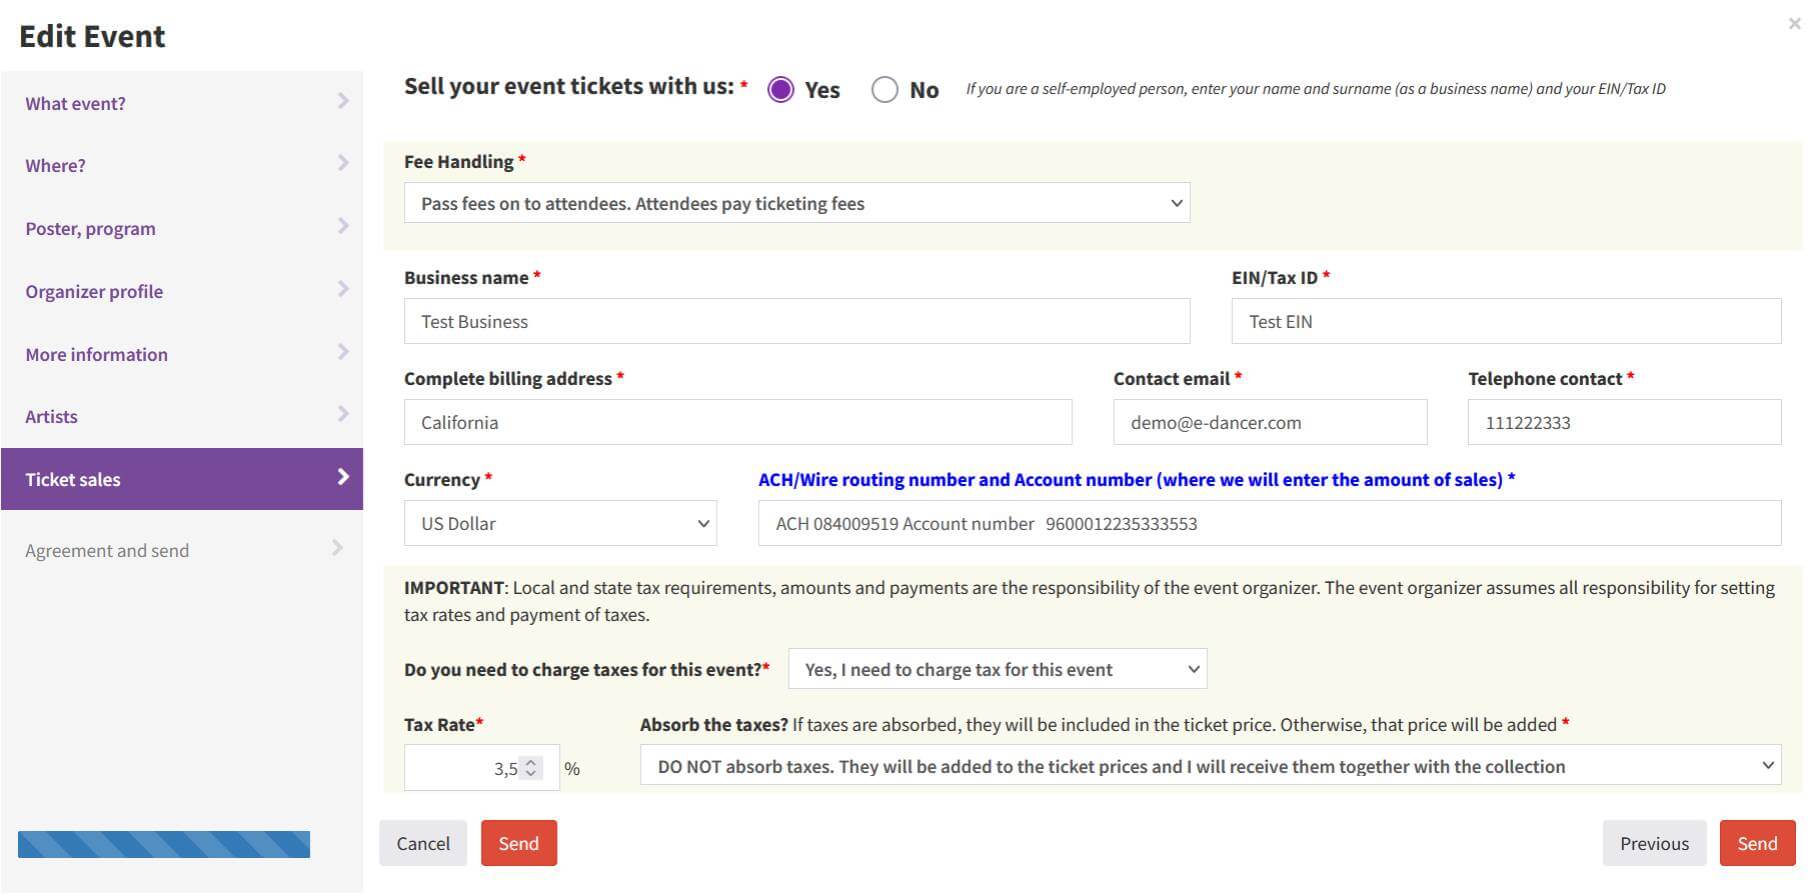
From e-dancer we will make the income of the collection of your event once it has been done . The amount you will receive will be the total collected for direct payments to e-dancer (through our bank POS or Paypal account), subtracting the e-dancer commission (only if it is not charged to the attendee).
Said amount will be paid via transfer to the bank account indicated in the "Ticket Sale" section of the event.
Before the end of the event, and within the 6 months prior to its start, you can request e-dancer to deposit part of the collection from ticket sales up to that moment. The total maximum amount to be deposited will be less than 30% of the collection if requested between 6 and 3 months in advance of the start of the event, and less than 60% if requested in the 3 months prior to the event. To calculate the amount that can be advanced, the sum of all advances previously made will be considered.
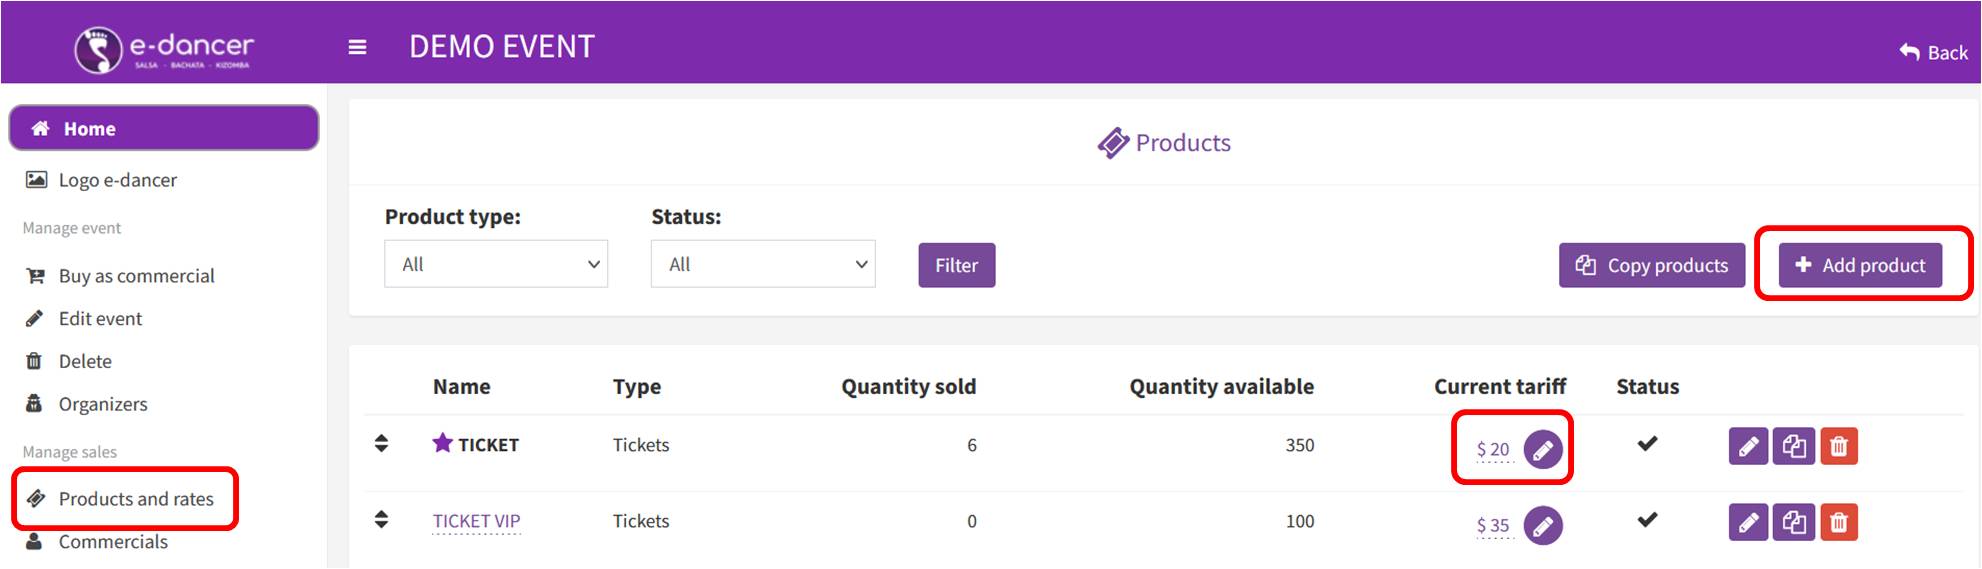
From the control panel of your event you have the option "Products and rates".
By accessing this option you can create and update the products (tickets) of your event.
For each product you can access the programming of its rates, that is, the price of the product at all times.
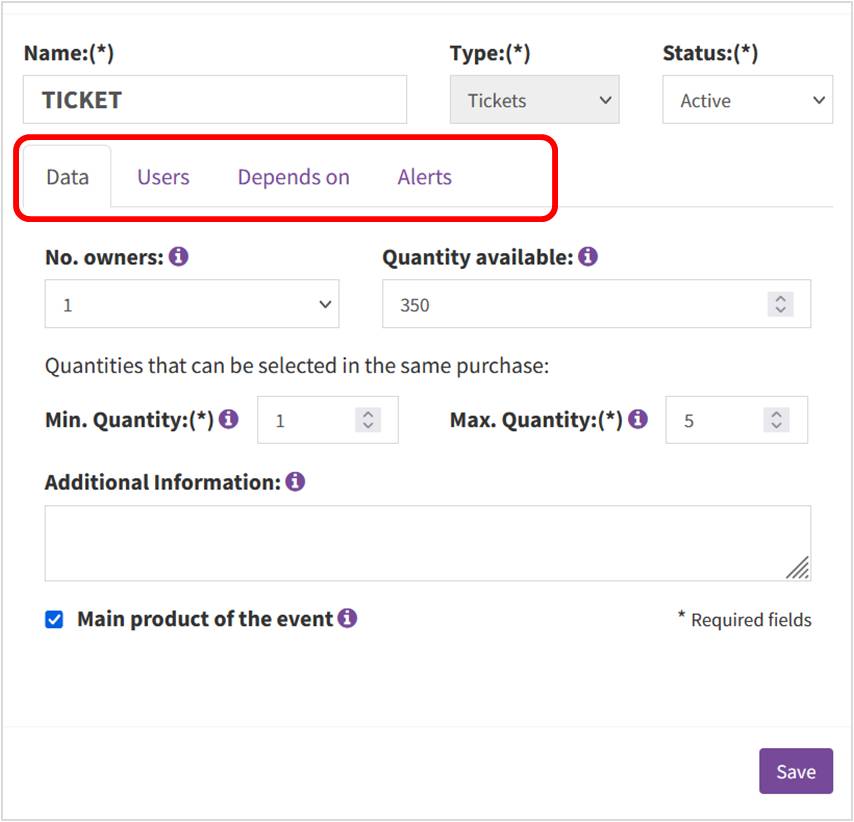
On a product sheet there are three basic data: name, type and status.
Currently a product can only be of type "Ticket".
The status indicates if the product can be purchased or not.
In addition to these basic data, there are additional data that allow you to configure the sale of the product.
"Data" tab:
"Users" tab: It allows defining which users can buy the product: all users, only commercials defined for the event, only public (non-commercial), or only a list of users (these users must be registered in e-dancer to be selected).
"Depends on" tab: Allows you to make this product can only be purchased by a user who already has another product or is included in the same purchase as this one.
It is useful, for example, for the case in which a Master Class can only be bought by users who have also bought or added to the purchase a pass (FULLPASS, FULLPASS VIP, etc.).
If several products are selected in this section, the platform forces the user to have one of them, not all. On the other hand, for a user to be able to buy a product that depends on another, it is necessary that in both they have entered exactly the same owner name .
"Alerts" tab: You can indicate if you want to receive by email a copy of each purchase made, as well as establish the limit number of availability of the product so that the user is shown this number when buying. By default this number is 25; that is, when there are 25 units left of the product (or less), the user will be informed that they are buying with the message "Only 25 units left".
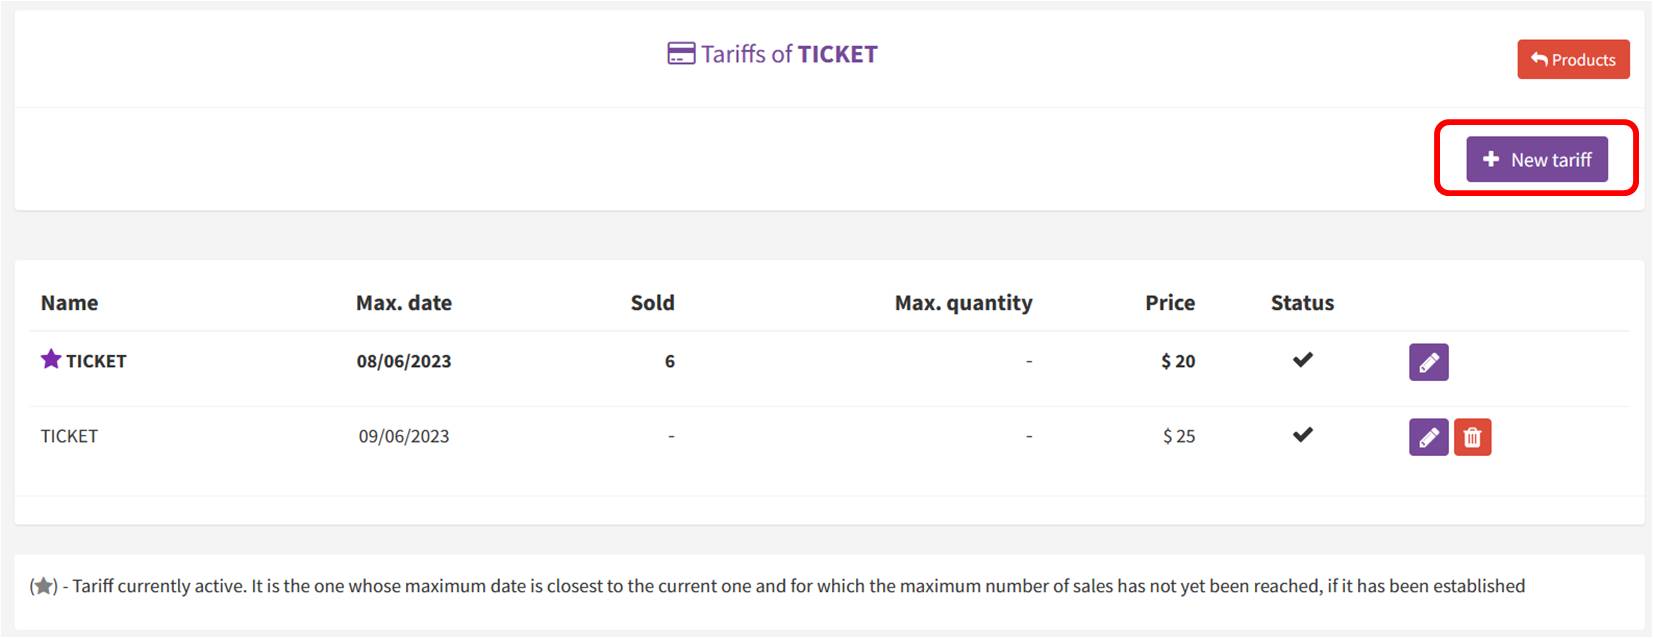
To set the rates for a product you must click on the button associated with said product. This will present the list of rates for the same.
One or more rates can be established for a product. Each rate indicates the price of the product at a specific time. This moment can be given by the current date or by the number of units of the product that have already been sold.
In the example image there is a product with two rates that change depending on the date: until 08/06/2023 they will be sold at $20 and from the following day at $25.
When the date associated with a rate is reached, it is automatically deactivated, and the one corresponding to the next period becomes active.
However, the rates can always be activated or disabled manually. To do this, simply edit it and change its status to "Inactive", or in the list of rates click on the icon
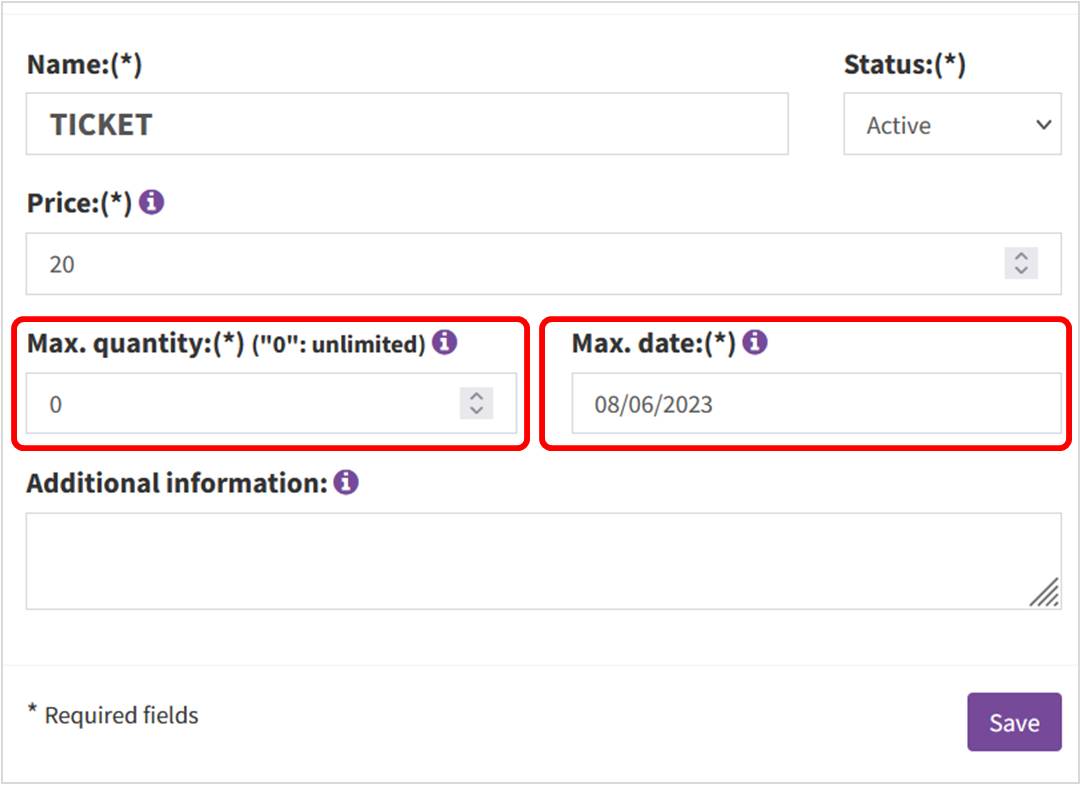
The screen for managing a tariff has the following data:
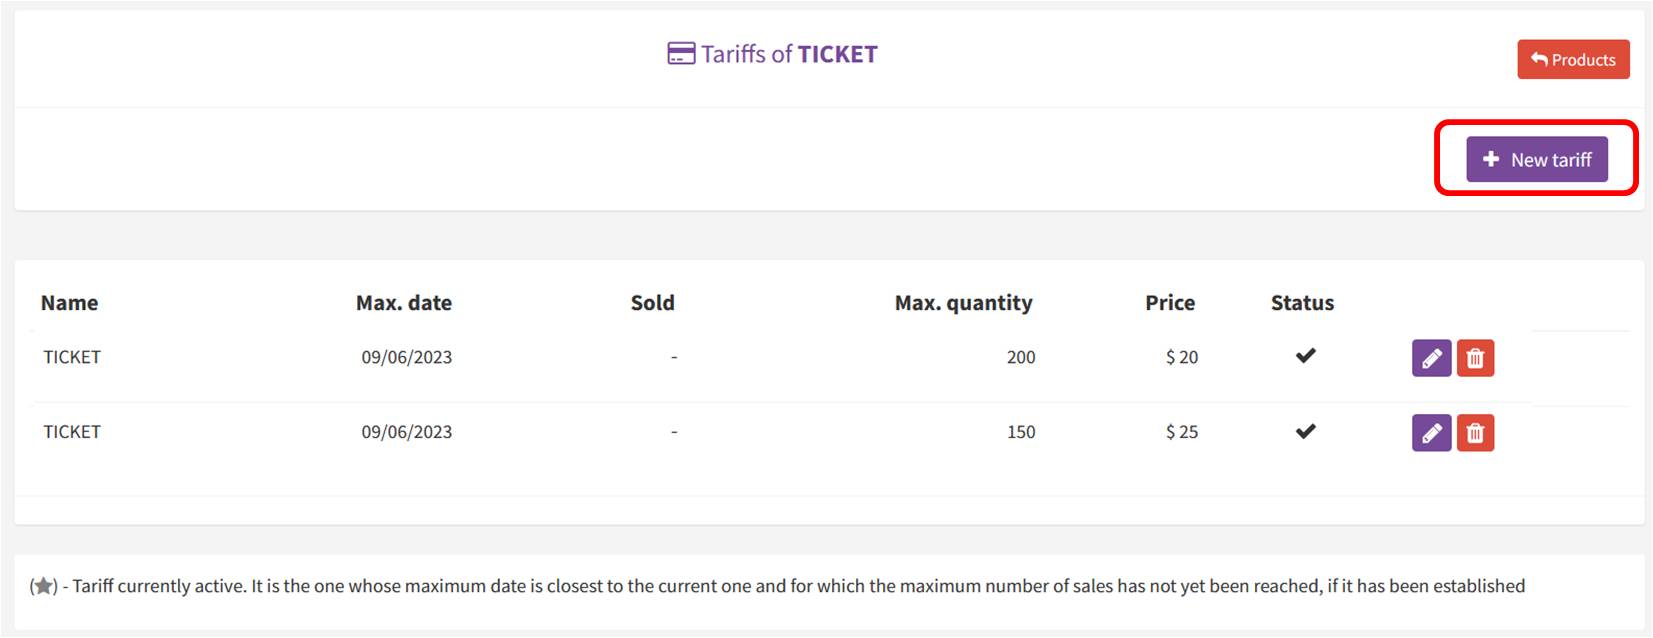
In this other example image, there is a product with two rates that change depending on the number of units sold: the first 200 units will be sold at $20, and the last 150 units at $25.
When reaches the maximum amount indicated for a rate, it is automatically deactivated, and the one corresponding to the next maximum amount becomes active.
To set the price of tickets you must access the option "Products and rates" in the control panel of your event.
click here to see how to use this option when setting prices.

This is an "Ticket" type product in which you must indicate 2 as the number of owners, in the case of a couple, or the number of people in the group in another case.
When the user purchases this product, they must enter the information of each of the owner included in this ticket. In the sales list, this purchase will be seen as a single ticket for which all its owners will be displayed. However, at check-in you will have the list of all the owners, since the user will get a ticket for each of them and they can be validated independently.
There is a second option to sell products to be purchased in groups (2 by 2, 3 by 3, etc.). For this, the data Min.Quantity and Max.Quantity of the product are used. click here to obtain information on this option.
For more information on how to create a product click here.
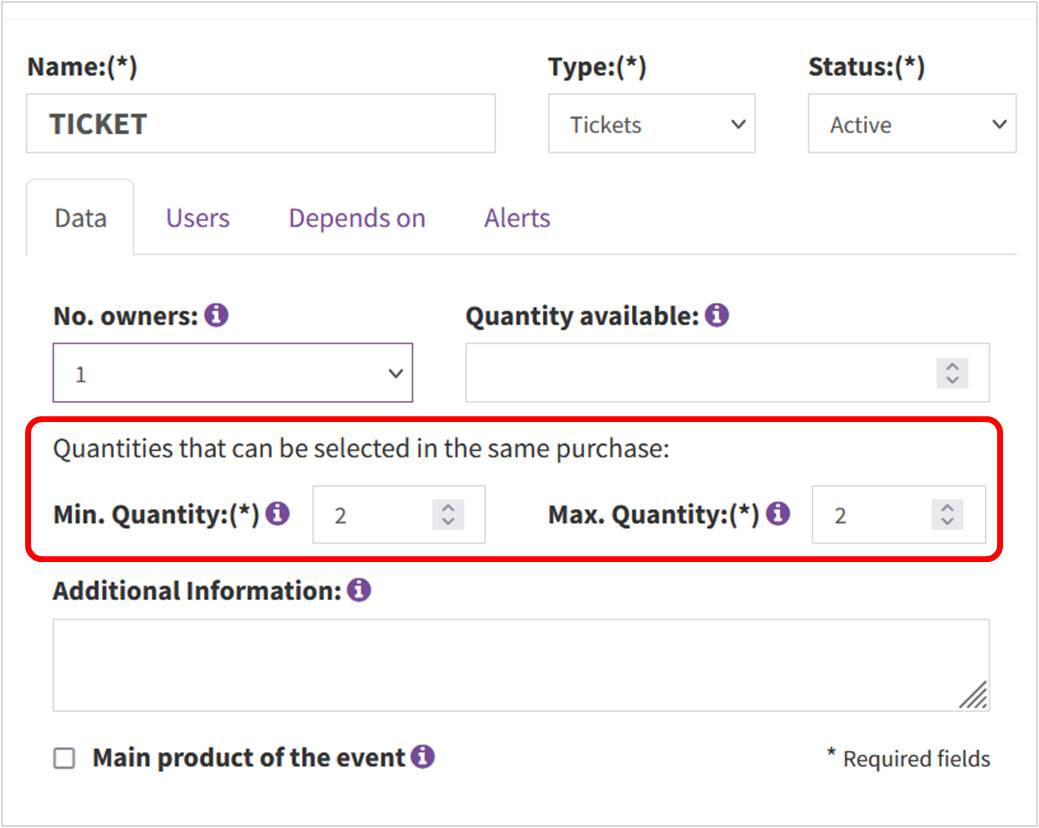
If you need a product to be bought in groups, you must use the fields Min.Quantity and Max.Quantity to indicate the quantity to be purchased. For example, setting 2 in this product data, the user is forced to buy 2 units of it.
This mechanism results in independent purchases, so in the sales list you will see them as different tickets .
If you need to know which owners are in the same group (for example a COUPLE FULL PASS) we recommend that make better use of this option .
For more information on how to create a product click here.
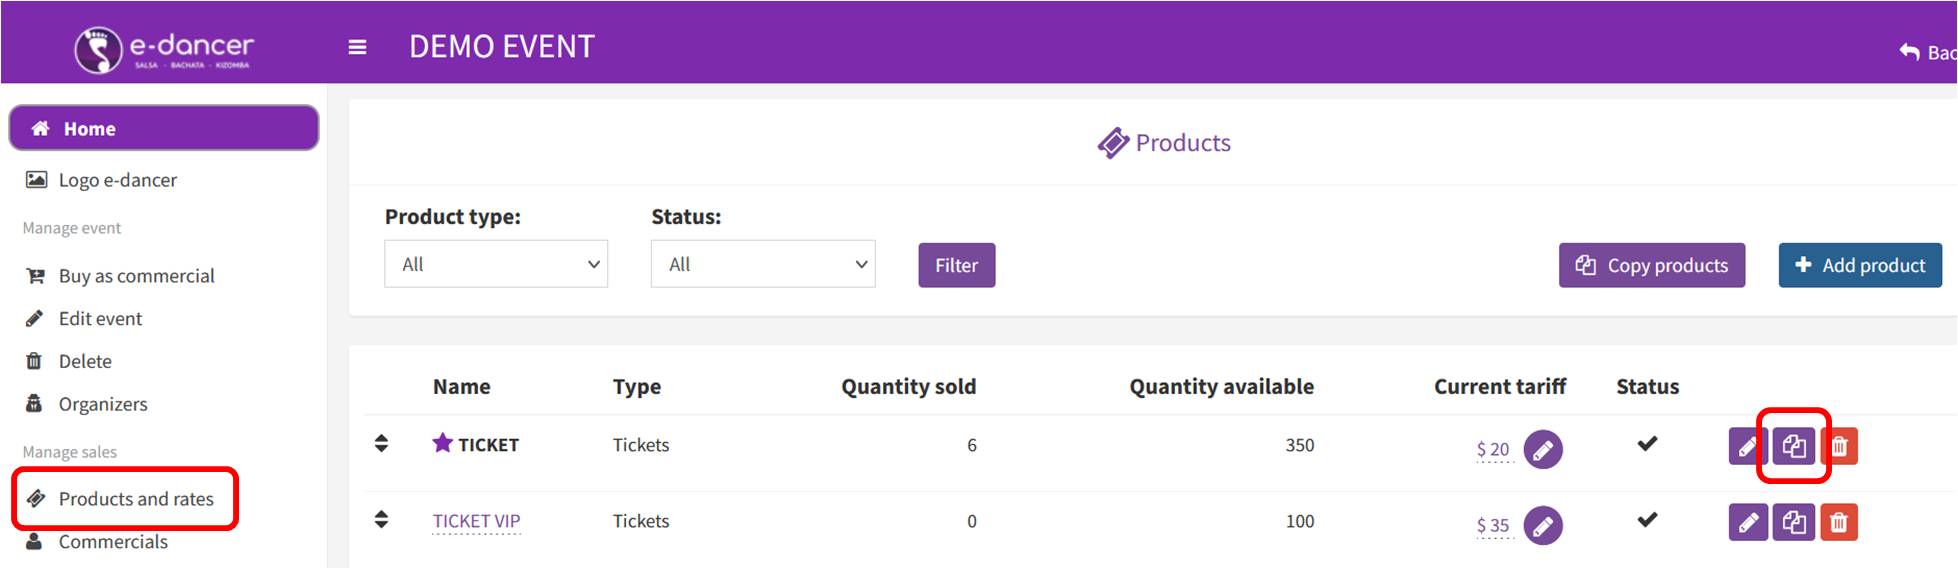
From the list of products, in the control panel of your event, you can create a new product as an exact copy of an existing one. To do this you just have to click on the button .
A product will be created equal to the one copied but in "Inactive" state "(not available for purchase), including the rates defined for that product.
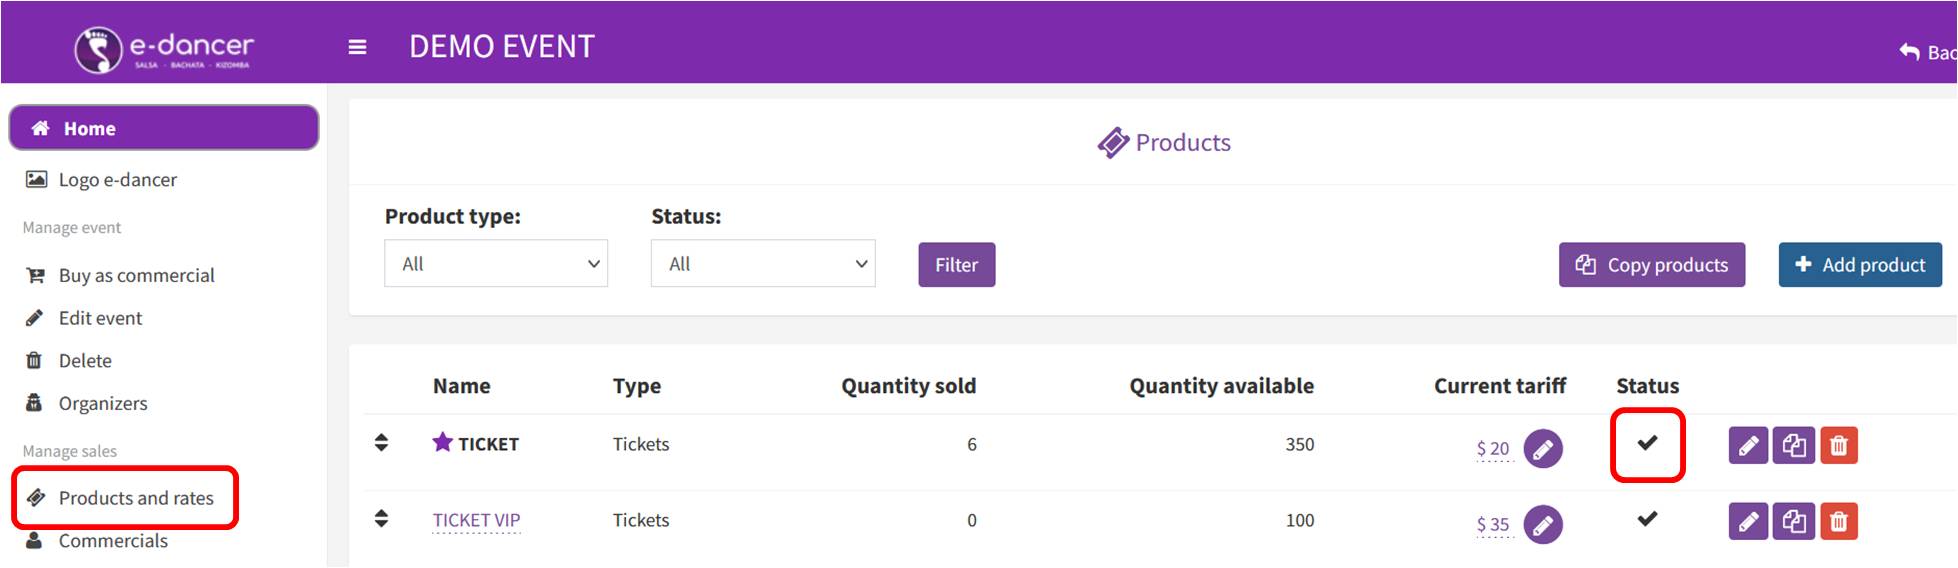
If for any reason you need to temporarily or permanently deactivate the sale of a product, just edit it and change its status to "Inactive", or in the list of products click on the .
To reactivate it, perform the same action, but change the status to "Active" or click on the icon
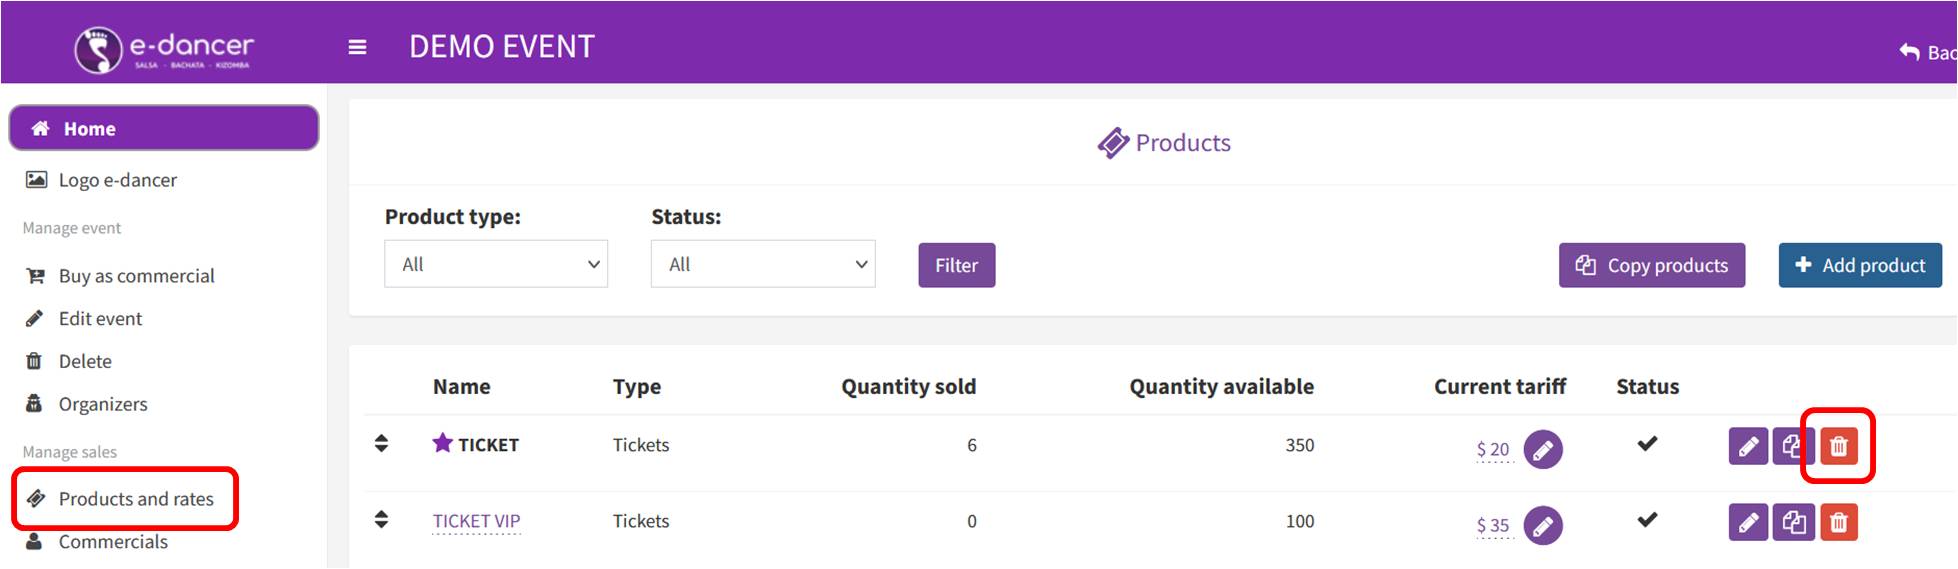
A product can only be deleted if it does not have rates (these must be deleted before deleting the product) or purchases or purchase attempts. If these conditions are not met, the product can only be deactivated.
If the indicated deletion conditions are met, you can delete an existing product. To do this you must click on the button .
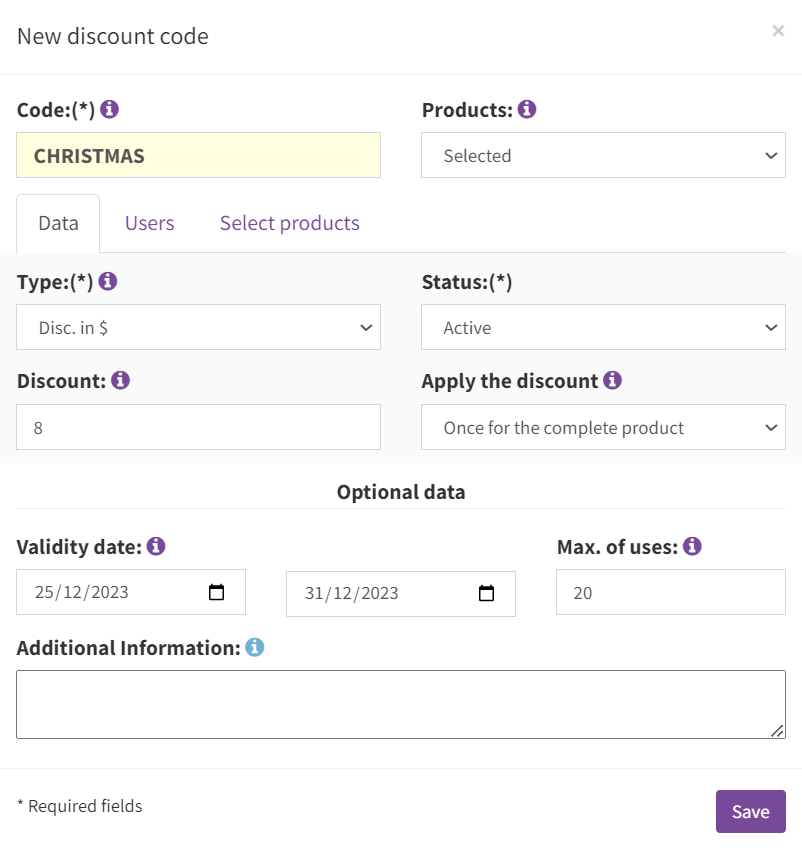
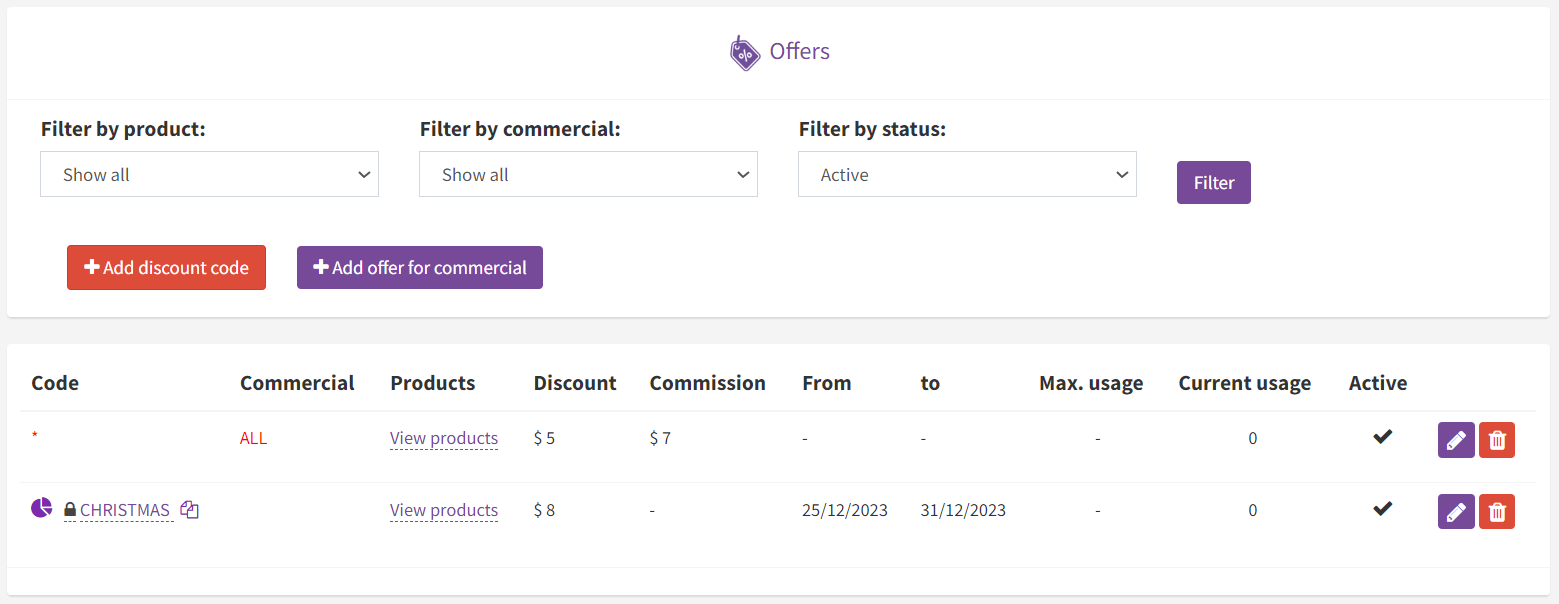
From the event control panel, through the option "Offers and codes", discount codes can be created.
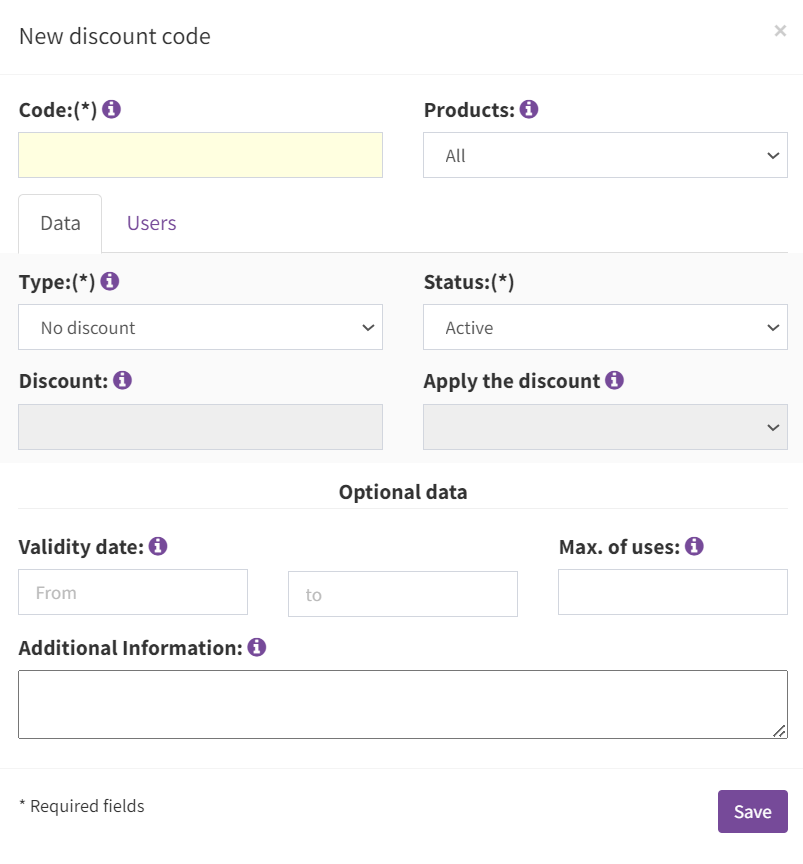
By means of the button "Add discount code" the screen to create a discount code is presented.
This screen contains the following information:
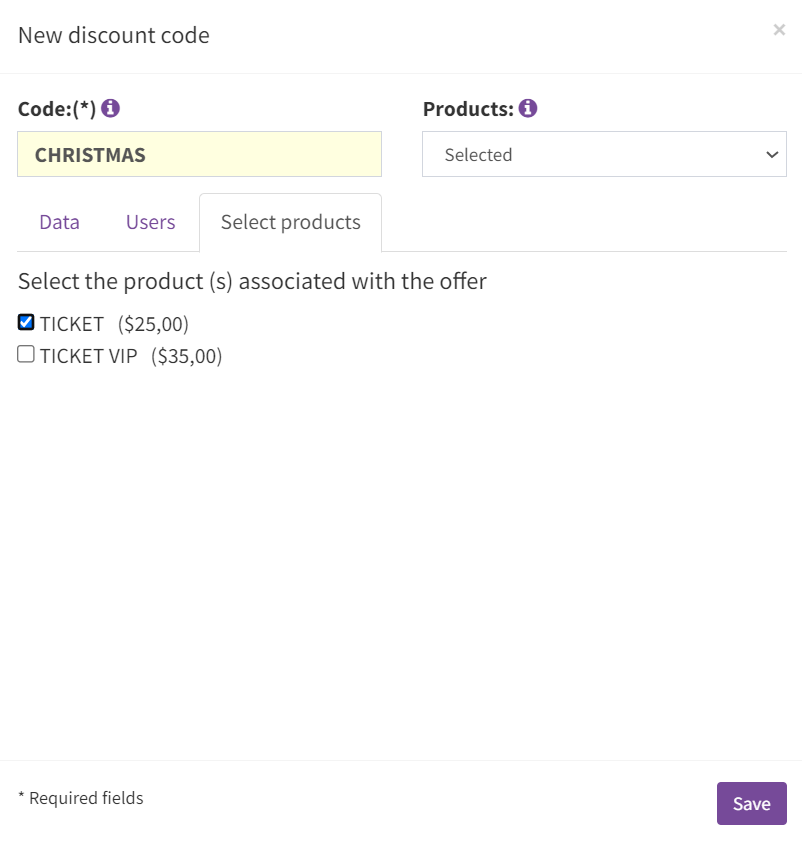
Example . In the images there is an offer code "CHRISTMAS" for users with a $8 discount on TICKET with a maximum of 20 uses and applicable from December 25 to 31.
It is possible, optionally, to restrict the application of a code to a group of users . For this, the following options are available in the "Users" tab:

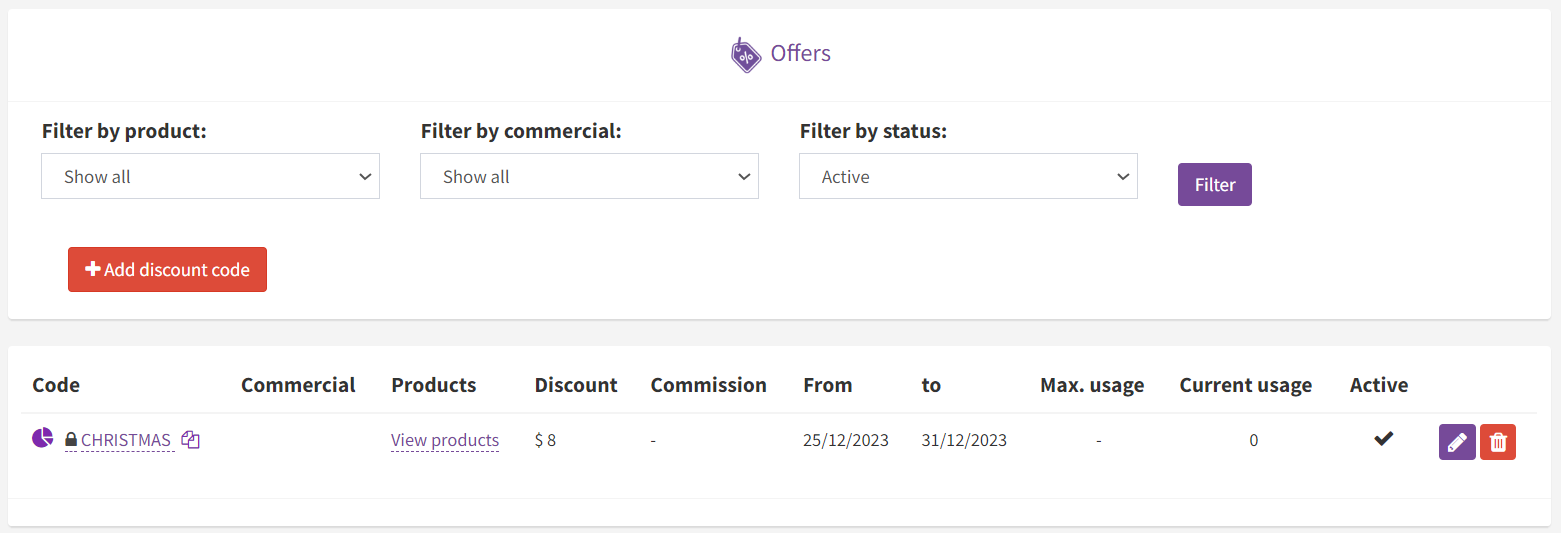
Once one or more offers have been created, they can be managed from the list: modify or delete them (an offer can only be deleted if it has not been used)
In the column "Current usage" you can see the number of times each offer has been used.
Next to each code, clicking on the icon the breakdown of sales by product in which this code has been used is presented.
In addition to purchases made directly on the e-dancer website and app, it is possible to designate sales representatives (teachers, physical points of sale, ...) for your event. These commercials will be able to make sales of your event in two ways:
In both cases, the sale remains associated with the commercial , so that if a commission is established for it for its sales, it is assigned to it. Further on, it is explained how to define the commission of each commercial and how to establish discounts if you buy through them.
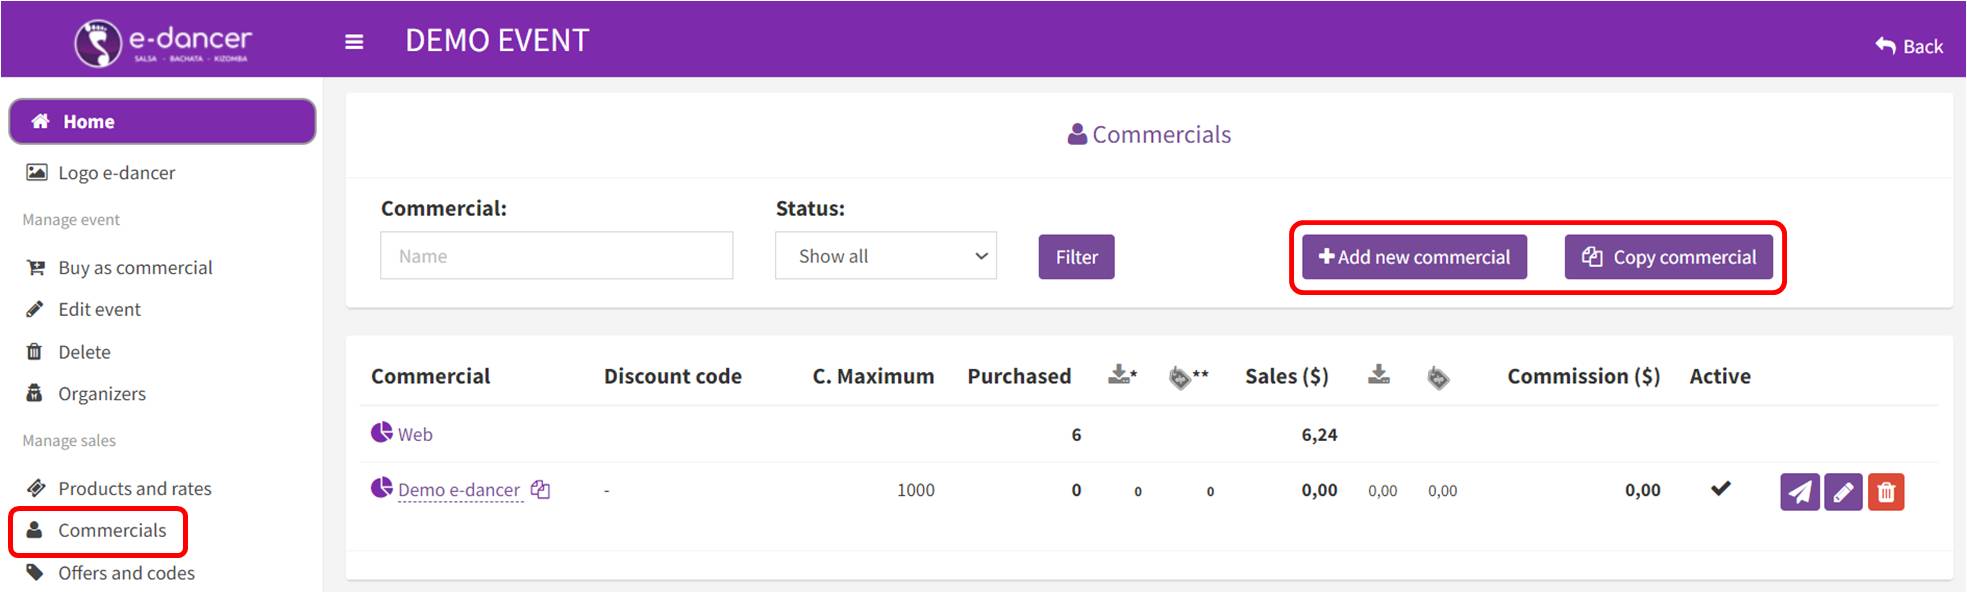
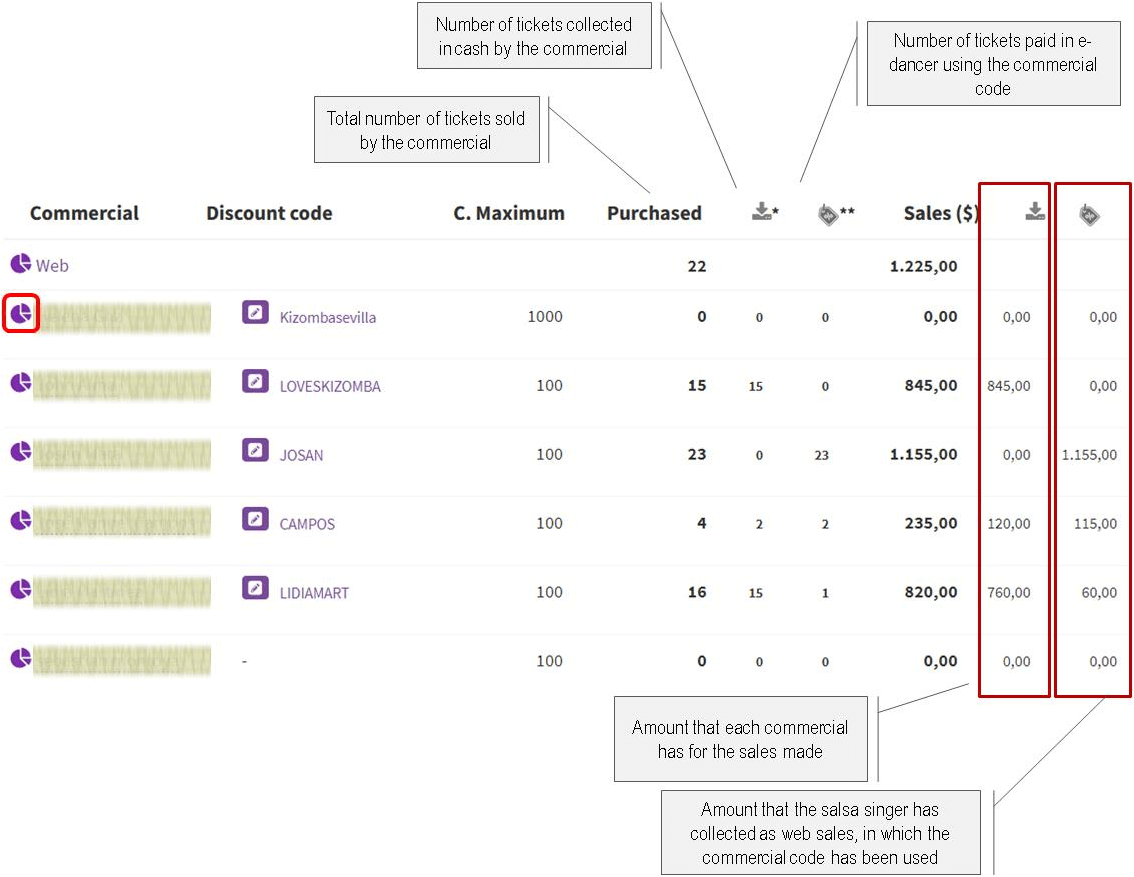
By default, in the list of commercials of the event the organizer of the event is always presented, as well as a "virtual" Web commercial that represents sales not made by commercials ; This allows you to compare sales through commercials with sales without their intermediation.
From this screen you can designate a new commercial for the event, or even copy all the commercials that are in another event of the organizer (in progress or old).
Click here to access the section that describes the information displayed by this screen in detail.
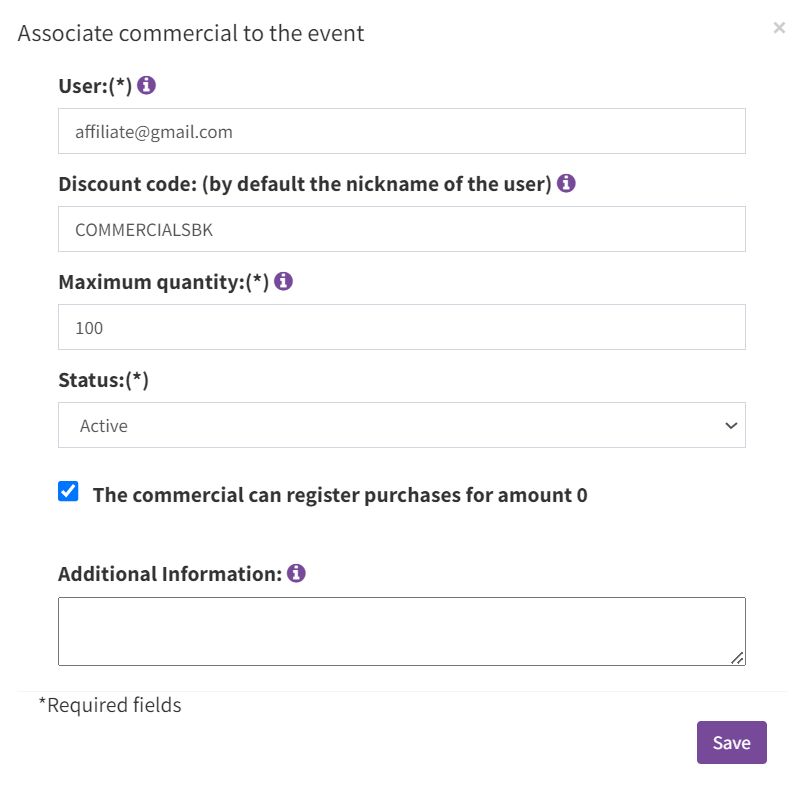
The registration and editing screen of a commercial has the following data:
Once the sales representatives have been defined for the event, they will be able to register sales (if they have been enabled for it), receiving them the amount of the same. However, their codes cannot yet be used and discounts will not be applicable
To enable commercial codes and establish discounts for their sales consult the following section or click here to access directly.In order to allow users to purchase using the code of a commercial, in addition to the commercial being designated for the event, its code must be enabled .
For this, the "Offers and codes" option of the event's control panel must be used. There are two options to enable commercial codes:
If you have an offer for ALL commercials, and a specific one is created for one of them, the latter will be the one applicable in the case of this commercial.
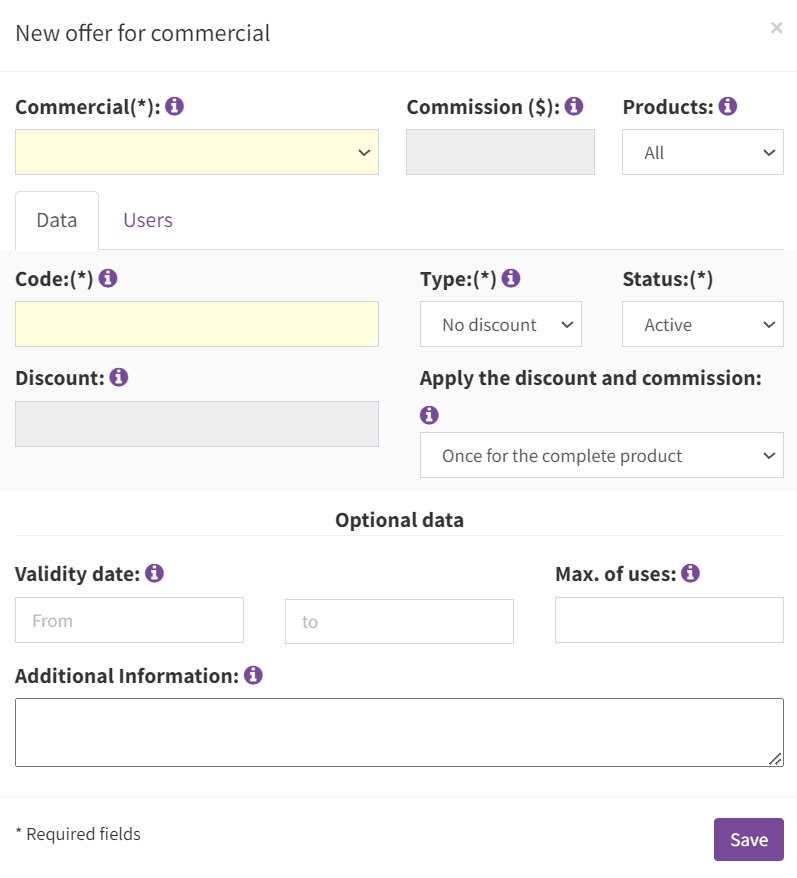
By means of the button "Add commercial offer" the screen to enable a commercial offer is presented.
This screen contains the following information:
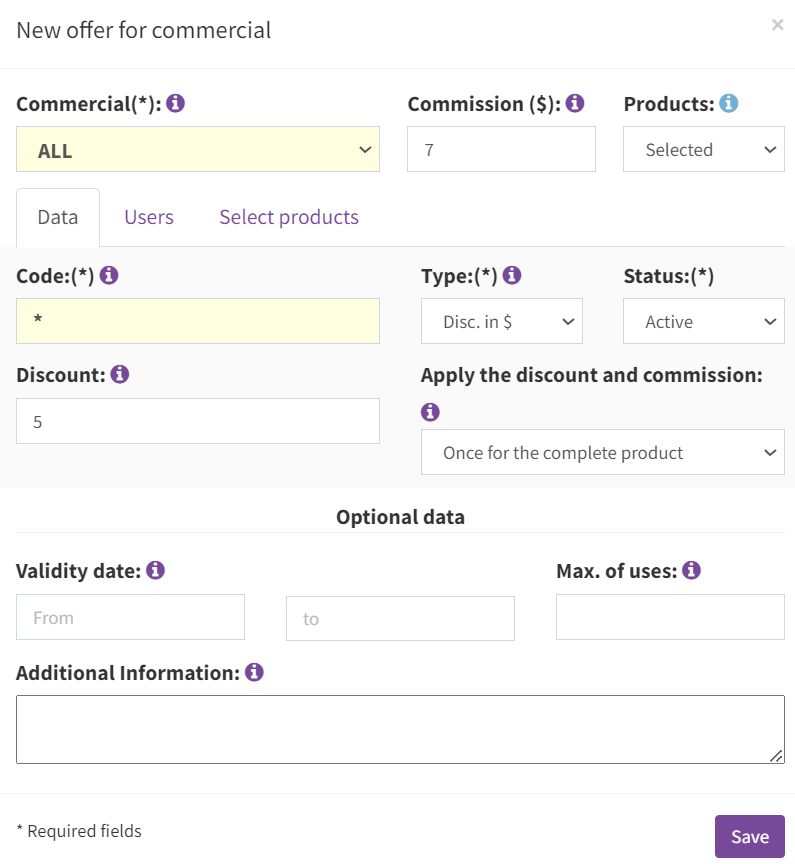
Example . The images show an offer code for all commercials (using their associated codes) with a $5 discount on TICKET for the buyer and a $7 commission for the commercial.

It is possible, optionally, to restrict the application of a code to a group of users . For this, the following options are available in the "Users" tab:
Once one or more offers have been created, they can be managed from the list: modify or delete them (an offer can only be deleted if it has not been used)
In the column "Current usage" you can see the number of times each offer has been used.
Next to each code, clicking on the icon the breakdown of sales by product in which this code has been used is presented.
The following image describes the meaning of each of the columns that the event's commercial management screen presents.
By clicking on the associated with a commercial, the breakdown of sales registered by it is presented.
Both the organizer of an event and a commercial assigned to it, can register their sales in e-dancer without making the payment. The amount corresponding to each sale is delivered by the buyer to the commercial, who registers the sale in e-dancer.
To register a sale you can choose:
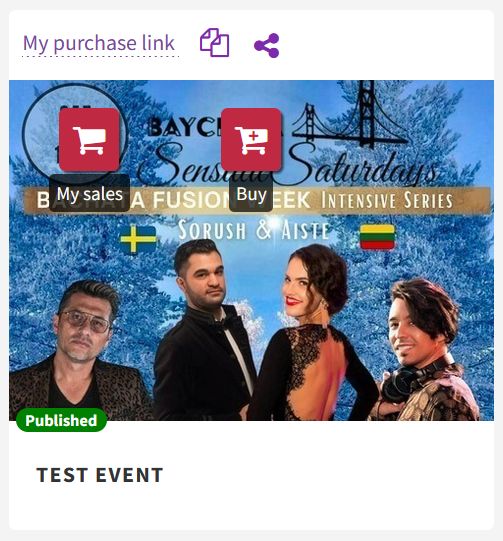
(1) Access your events as a commercial through the option "My events" in the "My profile" menu, and click on the "Buy" button
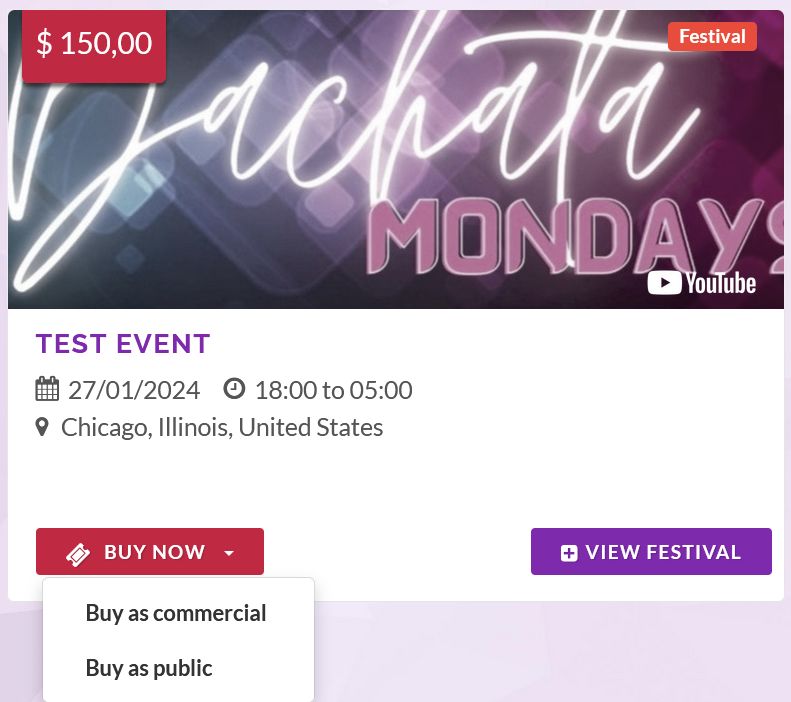
(2) Find the event on the main e-dancer page and use the "Buy as a commercial" function in the "BUY NOW" button
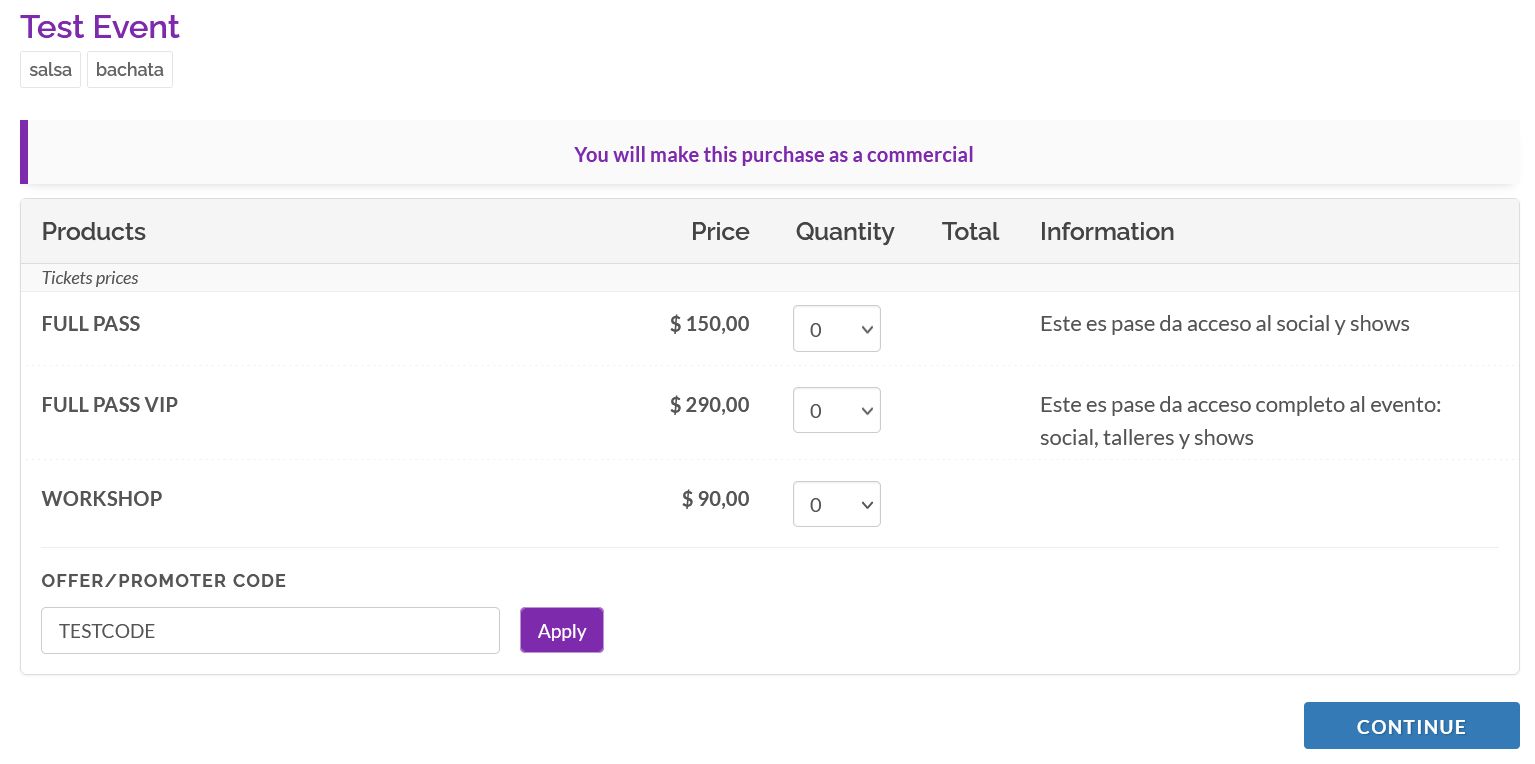
In any case, you will access the screen for selecting the passes to register. In it, the number of each type of pass to be registered will be chosen, subsequently pressing the "CONTINUE" button to enter the data associated with each selected pass.
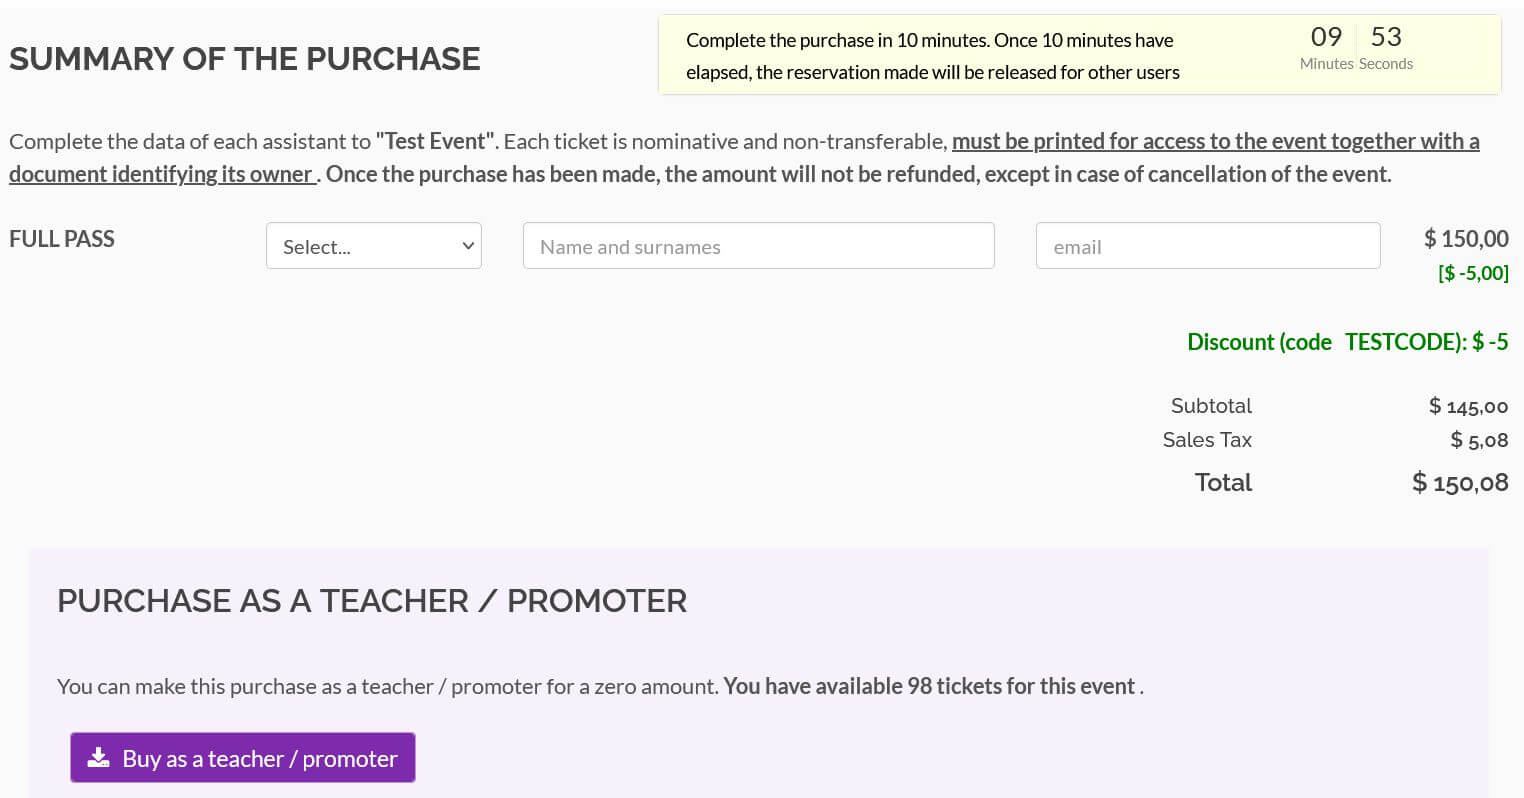
For each pass to register, the data associated with its owner must be indicated: man / woman, name and email. It is very important to indicate the data correctly for each owner, since each pass is nominative and will be sent to the indicated email.
Once the data of each owner has been entered, clicking on "Buy as teacher / promoter" will appear a screen to confirm the purchase. After confirming it, the passes will be registered and will be sent by email to their respective owners.
The commercial will also receive by email the set of all the passes as confirmation of the purchase.
A commercial has available the consultation and management of his sales made
A commercial can check the passes he has registered at any time. To do this, you must access your events (through the "My events" option in the "My profile" menu) and click on the "My sales" button.
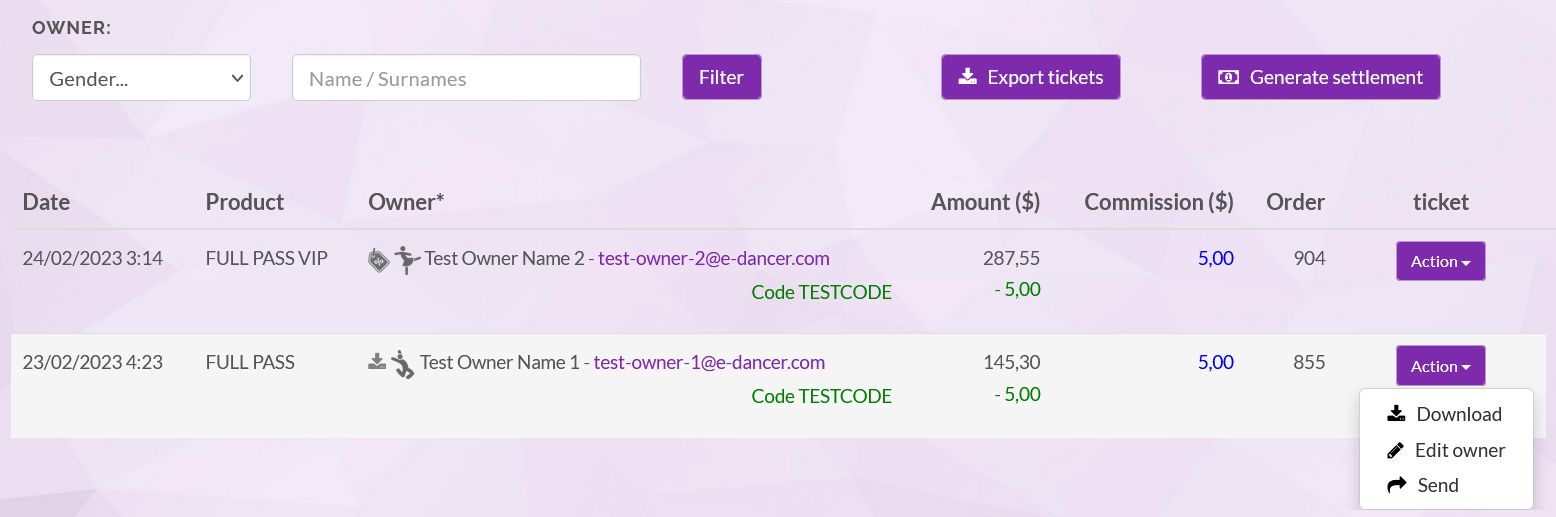
For each registered show, the commercial will be able to carry out the following actions (through the "Action" menu available in each show):
An organizer, meanwhile, can check all sales , including the query of the sales made by each commercial.
Click here to access the section where it is described how to check the sales of your event.
Both the commercials of the event and its organizers have the option of sharing a personalized link that implies the application of its code. To do this, it is necessary that the commercial / organizer has his code assigned.
To share this link, you must access the list of your events and click on the icon of the event you want to share (remember that it will only be available if the commercial / organizer has an associated code)
Options to share on social networks will appear ( facebook, twitter, ...) and, if it is being done from the mobile, also the option to share it from WhatsApp.

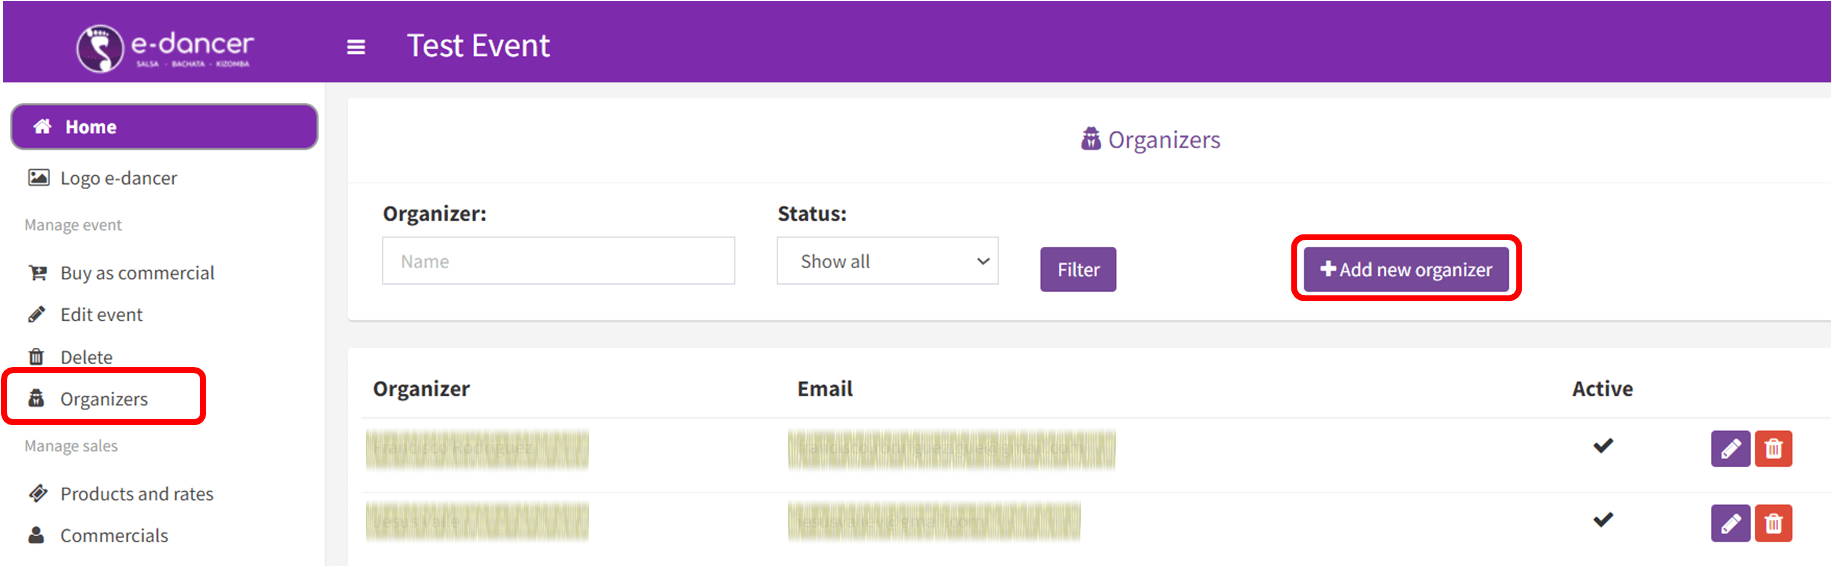
From the event control panel, the creator of the event will have the option "Organizers" available. This option is only accessible to the organizer who registered the event in e-dancer .
Initially, only the creator of the event in e-dancer will appear as the main organizer of the event. You can add additional organizers that will have the same functionalities available as you, except this one for managing organizers. In addition, they will automatically become commercials of the event, being able to sell tickets for an amount 0 if you indicate it in their configuration.
The registration screen for a new organizer is similar to the registration screen for a commercial. Thus, it is necessary that the user who is going to be designated as an organizer is previously registered in e-dancer .
On this screen, it is also possible to register as an organizer a user who was previously designated as the commercial of the event.
In the event control panel you have three options to consult the sales:
The following image shows the query for " Detailed sales ". This screen shows the total sales list, being able to filter by product , commercial (point of sale), name and email of a owner and date of purchase. As a "point of sale" it is considered, in addition to each commercial, the option "Web", which represents the sales made without the intermediation of salespeople.
This is the list of sales, it is possible to export it to format MS Excel using the "Export entries" button. If the export is carried out having previously established a filter, the export will only be made of the sales that comply with this filter.
For each sale you can consult the owner / s (name and email), product purchased , commercial that registered the purchase (if it was not made by the commercial, "Web" is indicated), offer code applied in the purchase and corresponding discount, if any (the latter two shown in green).
In addition to consulting the sales, the following actions can be applied to each of them , using the associated "Action" button:
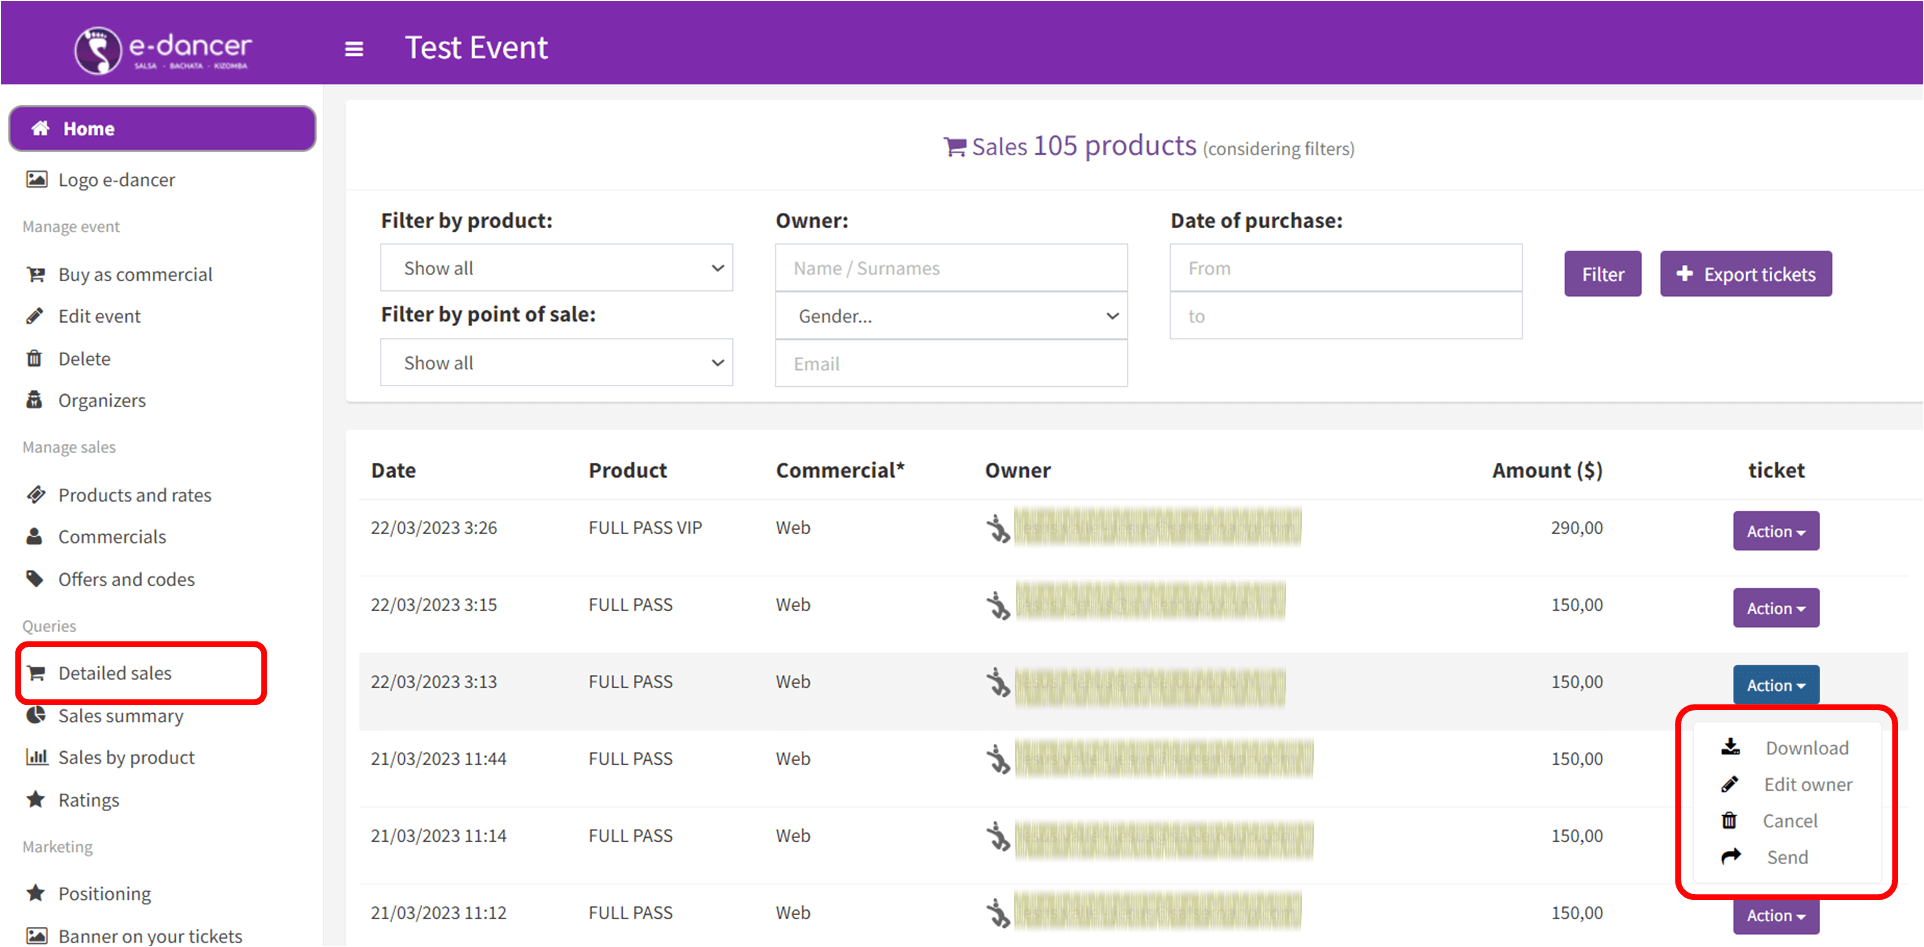
Using the option "Detailed sales" of the event control panel, you can locate a specific purchase by name and / or email of the owner. Once located, using the "Edit owner" option available in the "Action" menu associated with said purchase, you will be able to modify the owner's data: man / woman, name and email. When updating the data, the original pass is canceled (a cancellation email is sent to the original owner) and a new pass is generated with said data (which is sent by email to the updated owner).
Click here to access the section where the option "Detailed sales" is described and how to apply the modification of a owner.

Using the option "Detailed sales" of the event control panel, you can locate a specific purchase by name and / or email of the owner. Once located, using the "Cancel" option available in the "Action" menu associated with said purchase, you can cancel it. When doing so, a cancellation email is sent to the owner.
[IMPORTANT] This action does not refund the amount to the owner. If the payment was made to e-dancer you must contact us to make the refund . If the payment was made to a commercial, he must be in charge of reimbursing it.
Click here to access the section where the option "Detailed sales" is described and how to apply the modification of a owner.

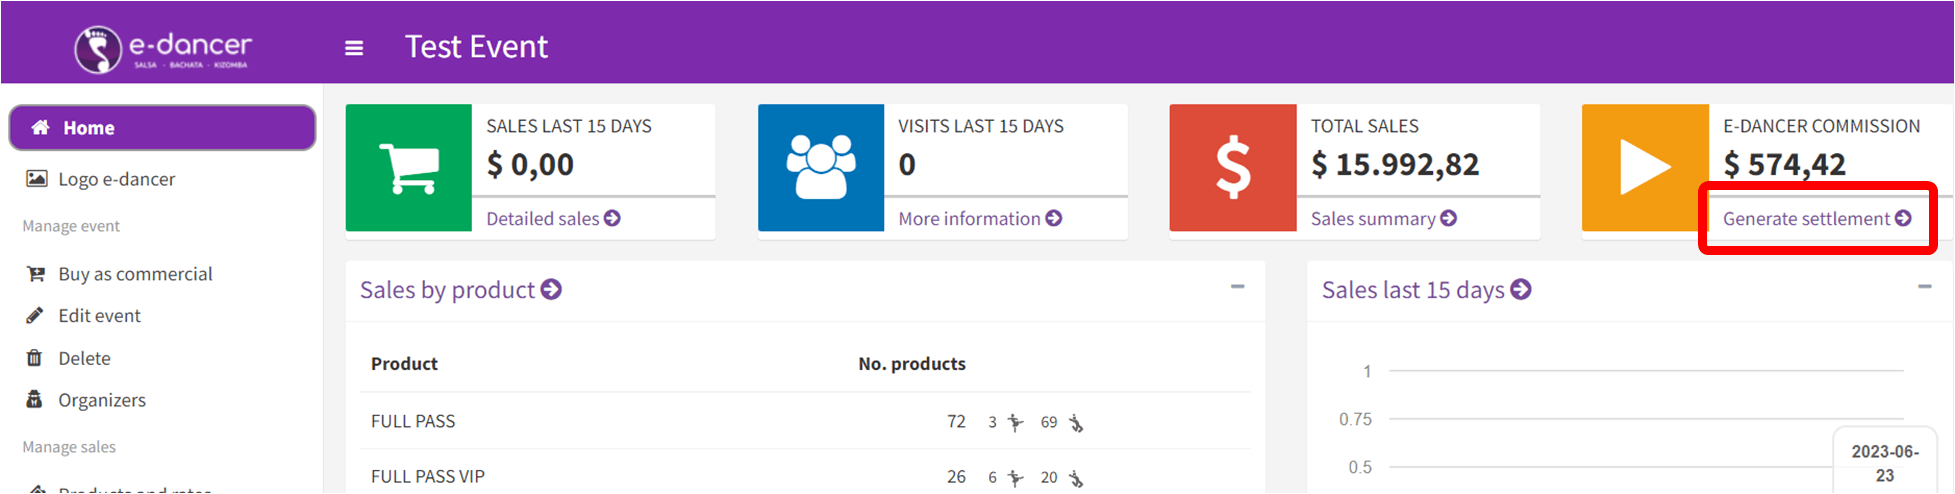
Within the control panel of your event, in the upper right column that indicates the "e-dancer COMMISSION" today, you have the link "Generate settlement" with which generates a PDF document with the provisional settlement of the event including:
Keep in mind that the information shown is provisional, since until the end of the event it will not be completed with the final e-dancer commission.
If you have your own website, it is possible to integrate the sale of your event in e-dancer into it.
For this, you or the designer / developer of your website , you must include in your web page a "Frame" with the following HTML code:
<iframe width="100%" height="800px"
src="https://e-dancer.com/eventshop/[EVENT]?compra=frame" frameborder="1">
</iframe>
The following substitutions must be made in this HTML code:
<iframe width="100%" height="800px"
src="https://e-dancer.com/eventshop/9876?compra=frame" frameborder="1">
</iframe>
If for any reason it is necessary to cancel your event, you must contact us via email at info@e-dancer.com to inform us of this fact.
We will discuss with you the procedure to follow to carry out the cancellation. We will take care of refunding purchases to users who have paid on our platform. The refunds of purchases registered by commercials will be their responsibility.
If it is the organizer who pays e-dancer the commission for event sales, the event's cancellation does not exempt the organizer from paying said commission to e-dancer. This is because the service has been carried out by e-dancer, also incurring in the expenses of the collection management platforms (POS, Paypal, Stripe) and in the cost derived from the refunds to be made.
We describe the procedure to follow to manage the check-in of an event. For this, the e-dancer platform provides two tools:
There is no limit to the number of authorized users to validate entries, and it is possible to use both tools simultaneously.
MANAGEMENT OF EVENT VALIDATOR USERS
A validator user is one who has been authorized to manage the check-in of the event (validate tickets). Only the promoter of the event can manage the authorized validator users.
For this, there is the "Validators" function accessible from the event control panel. When selecting this function, the list of defined validator users will be presented; initially empty.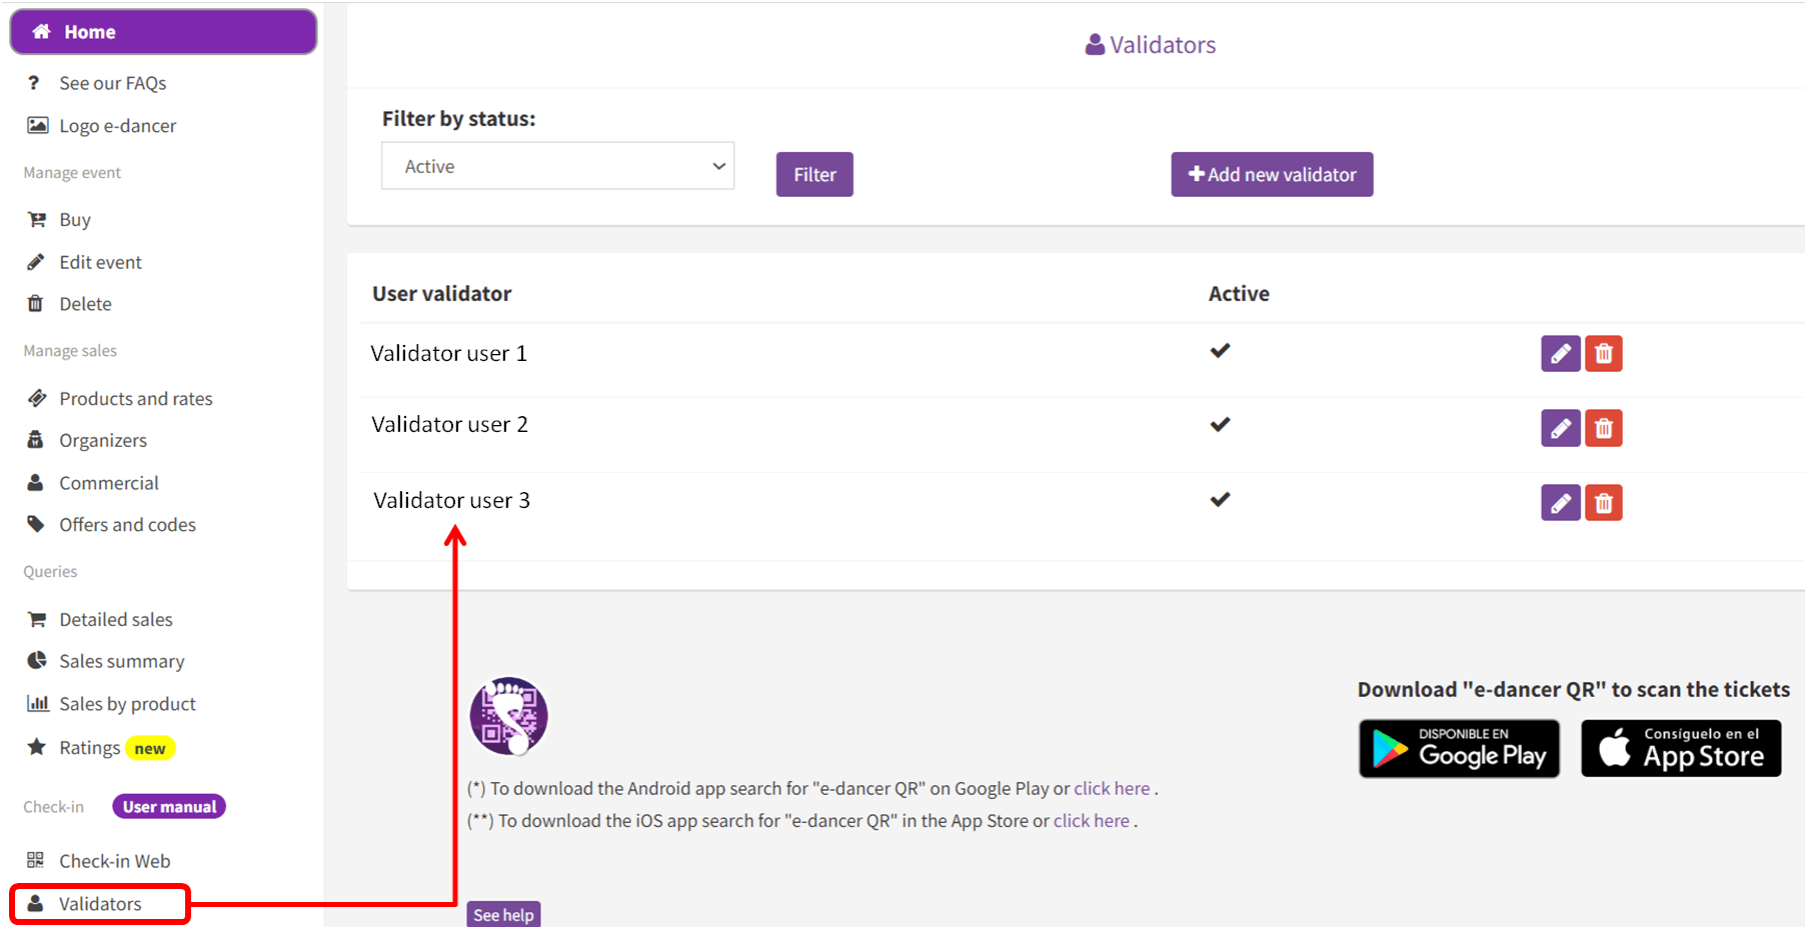
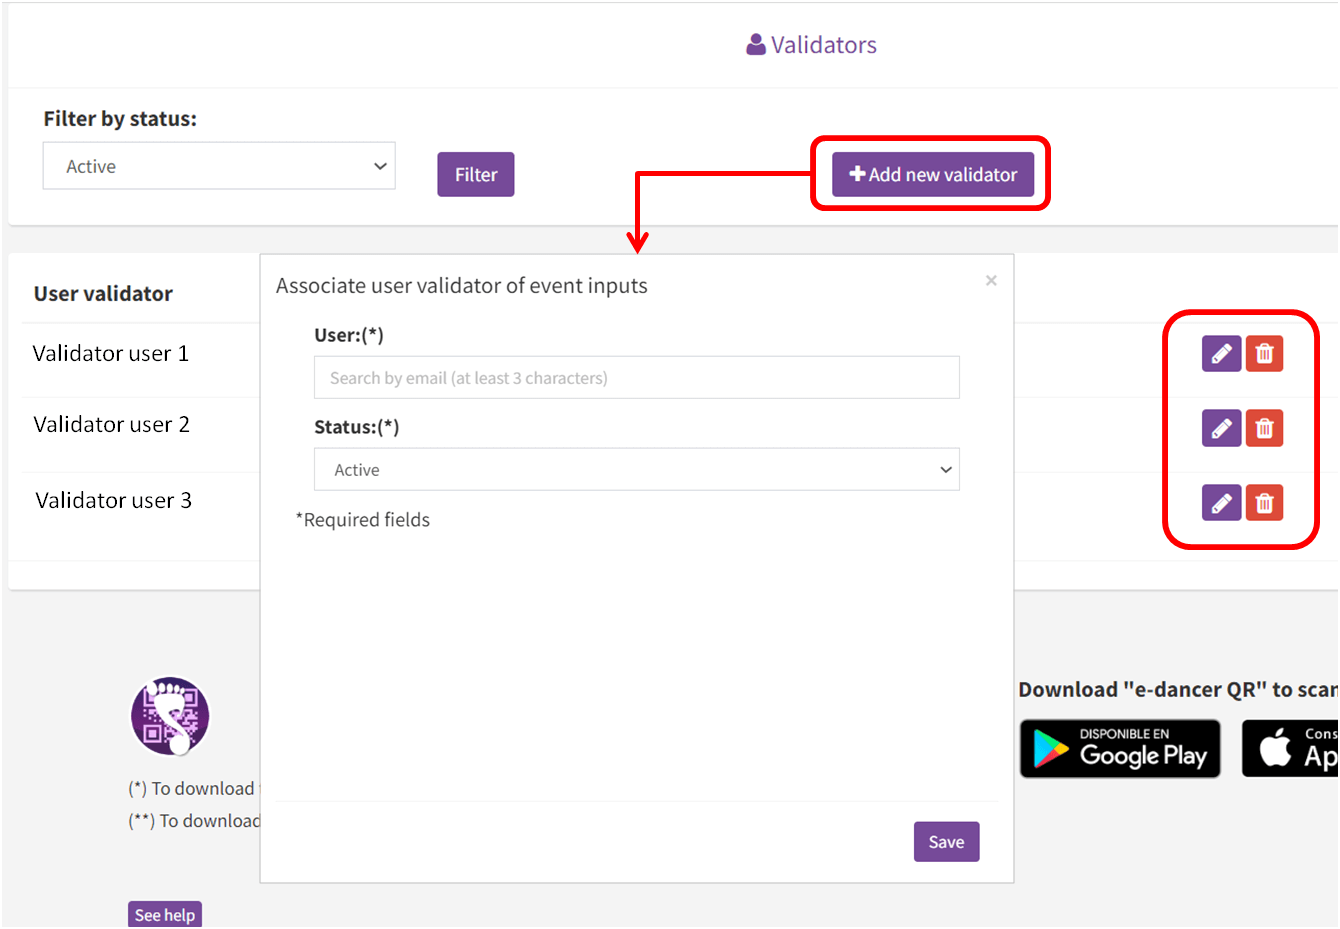
To add a new validator, you need to be registered as a user in e-dancer. By means of the "Add new validator" button, new validator users can be incorporated to manage the check-in of the event. Existing users can also be deleted (delete button) or deactivated (edit button).
VALIDATION OF TICKETS FROM www.e-dancer.com
Any user validating the event will be able to access the check-in of the event on the website of e-dancer (www.e-dancer.com). To do this, you must identify yourself with your username and password. Through the option “My events” in the “My profile” menu, you will have access to the “Check-in” function of the event:
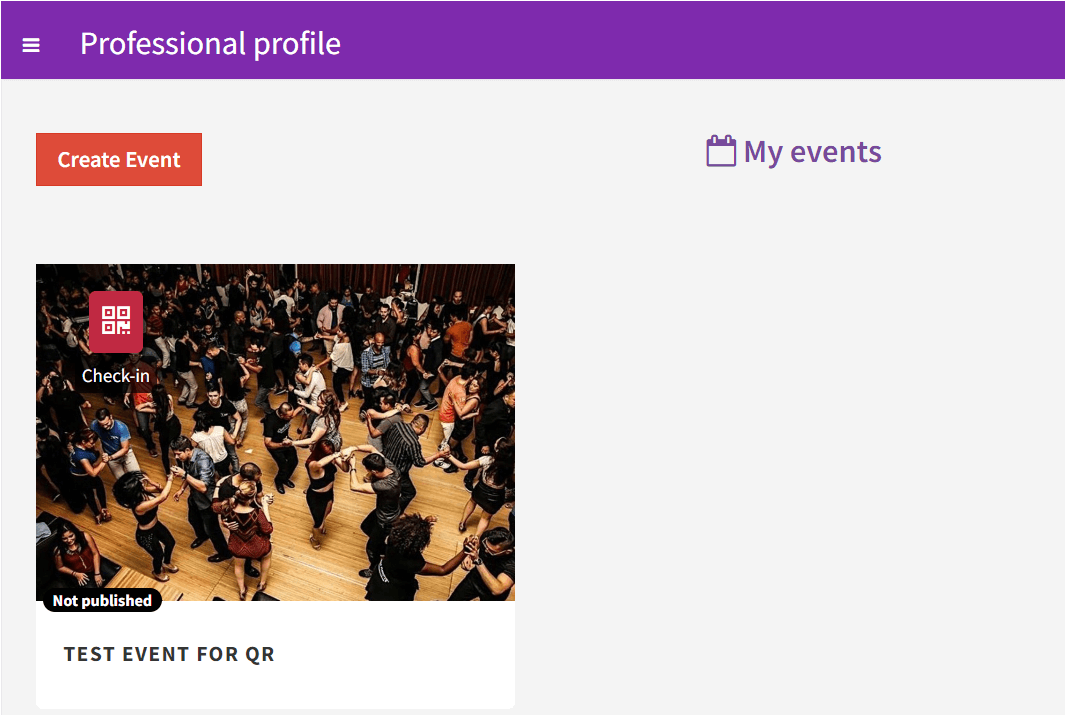
In the case of the event promoter, you can also access from the "Check-in Web" option available in the control panel, under the "Validators" option.
When accessing the function, the list of all the product owners purchased for the event will be presented.
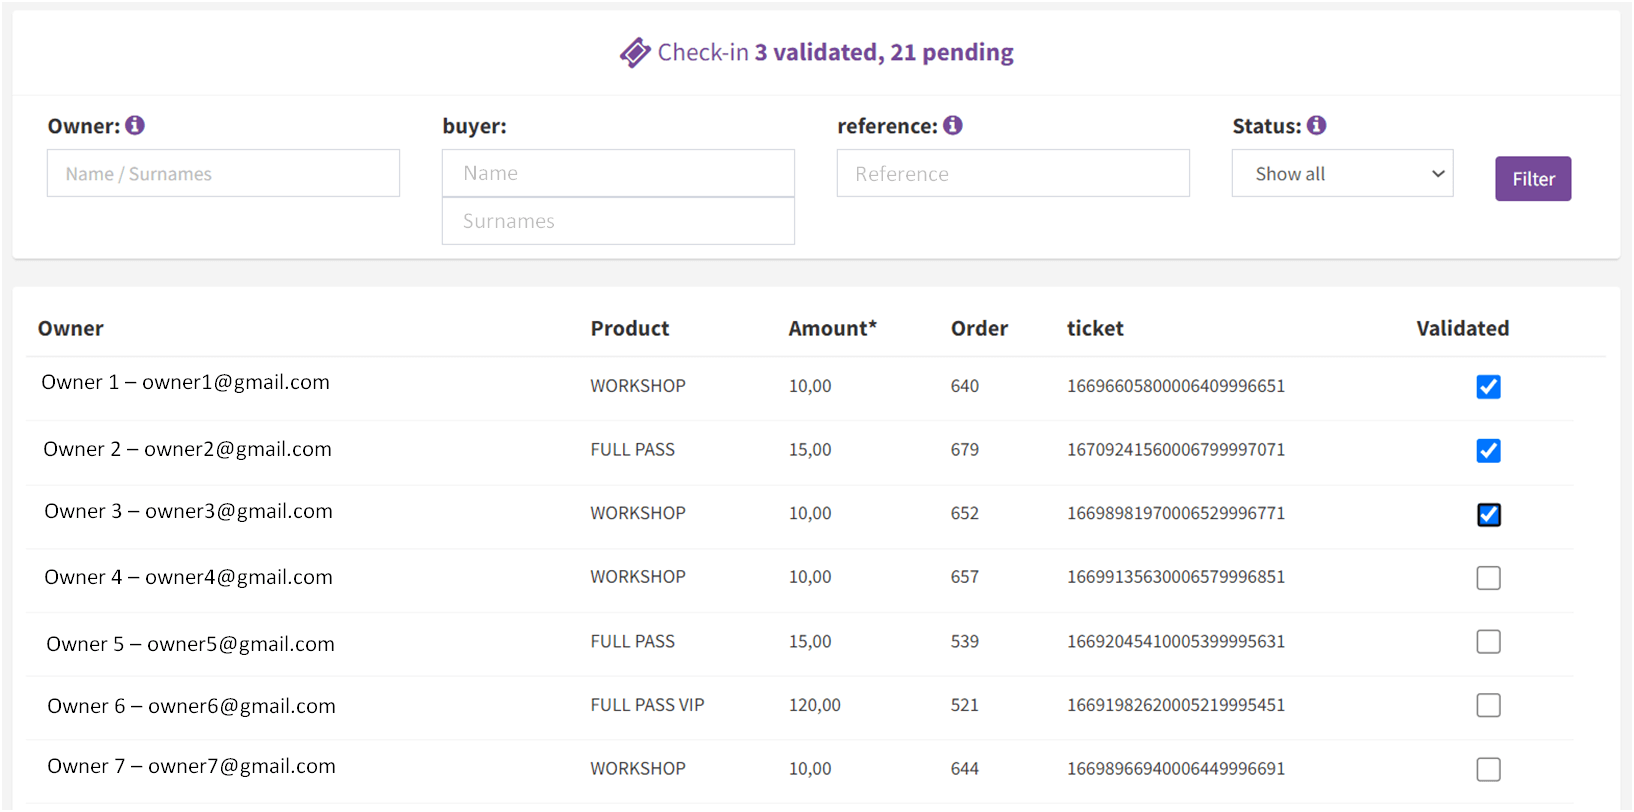
At the top of the screen it is indicated how many products have already been validated and how many are pending. There are also several criteria to search for a pass to validate:

By "checking" the column "Validated" for a owner, it is validated. However, by re-checking it, it will be unmarked. This is useful for cases where it has been validated by mistake.
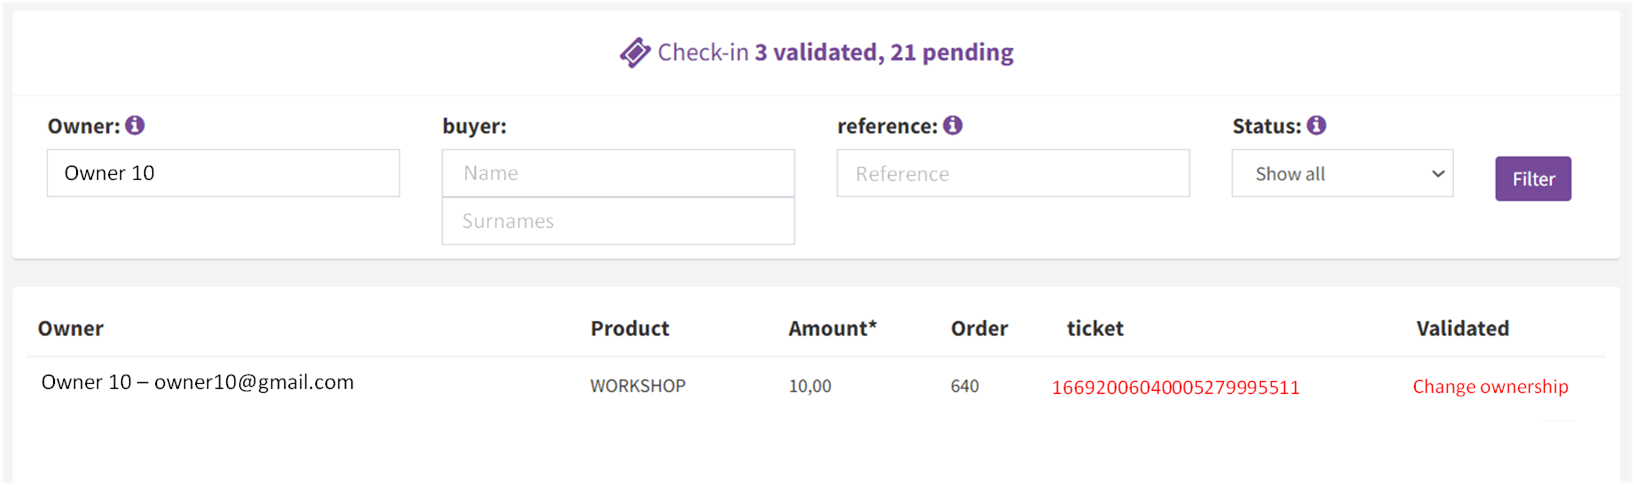
If when searching for a pass it appears as “Change of ownership”, it is a pass that is not valid, since its owner changed to someone else's name:
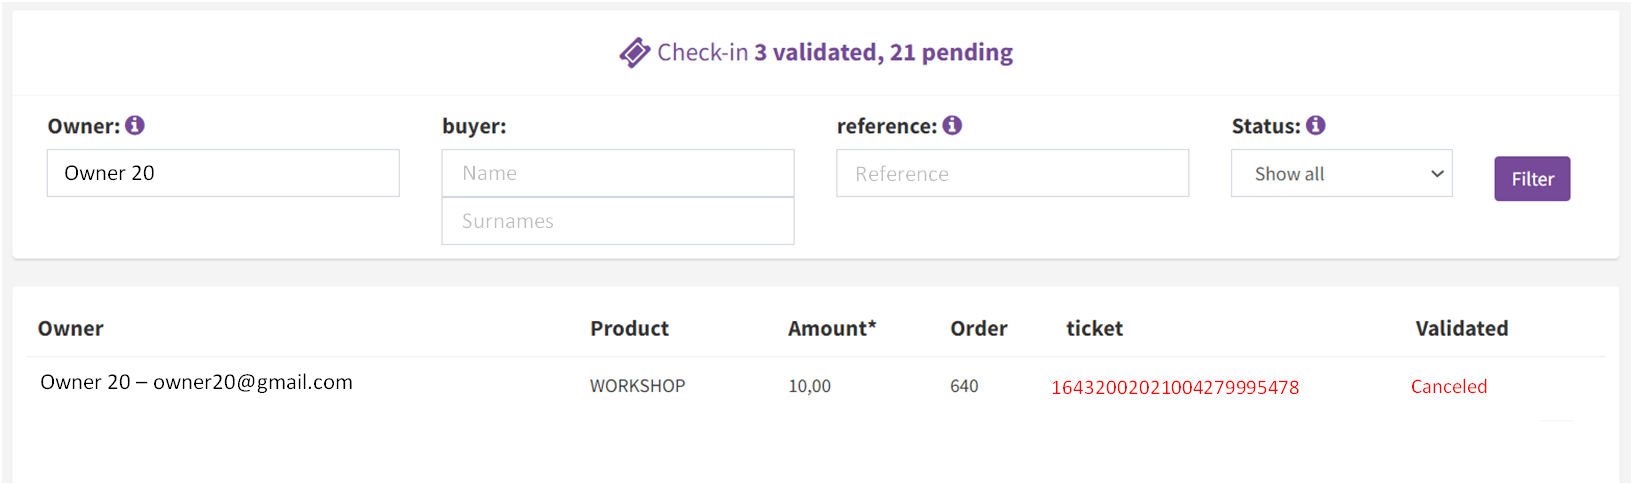
It may also be the case that a pass is presented as “Canceled”. As in the previous case, it is an invalid step, since it has been previously canceled by the promoter.
TICKET VALIDATION THROUGH THE e-dancer QR APP

The e-dancer QR Android App allows the validation of tickets using the QR code printed on them. It can be downloaded for Android from Google Play and for iOS from the App Store:
This App can only be used by users who have been defined as "validators" by the promoter of the event.
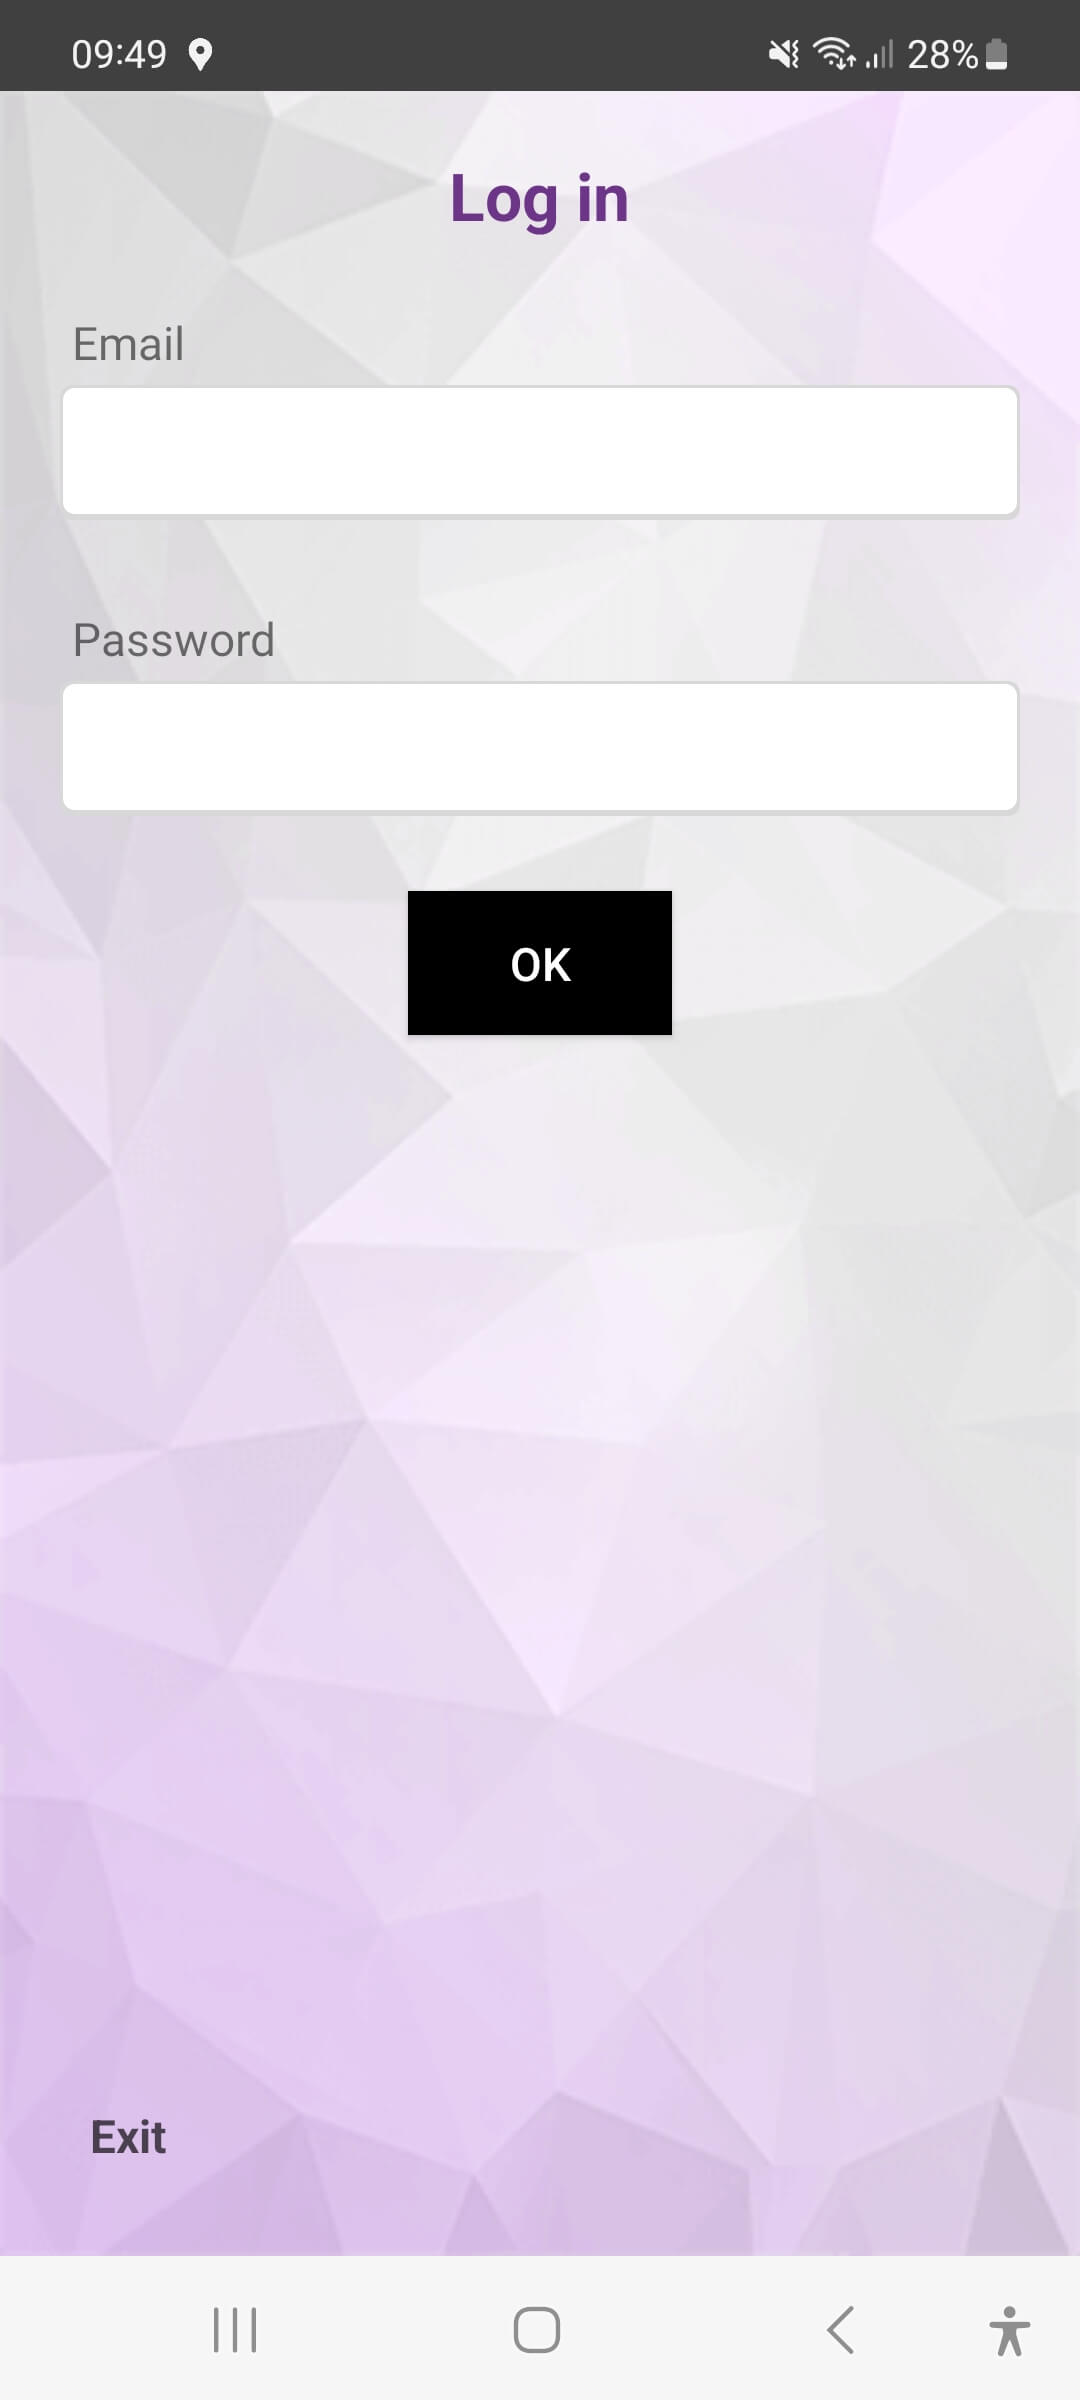
The App appears on the device with the name "e-dancer QR ". When starting it, the user's login screen is presented. The same user credentials that are available for the e-dancer website will be used .
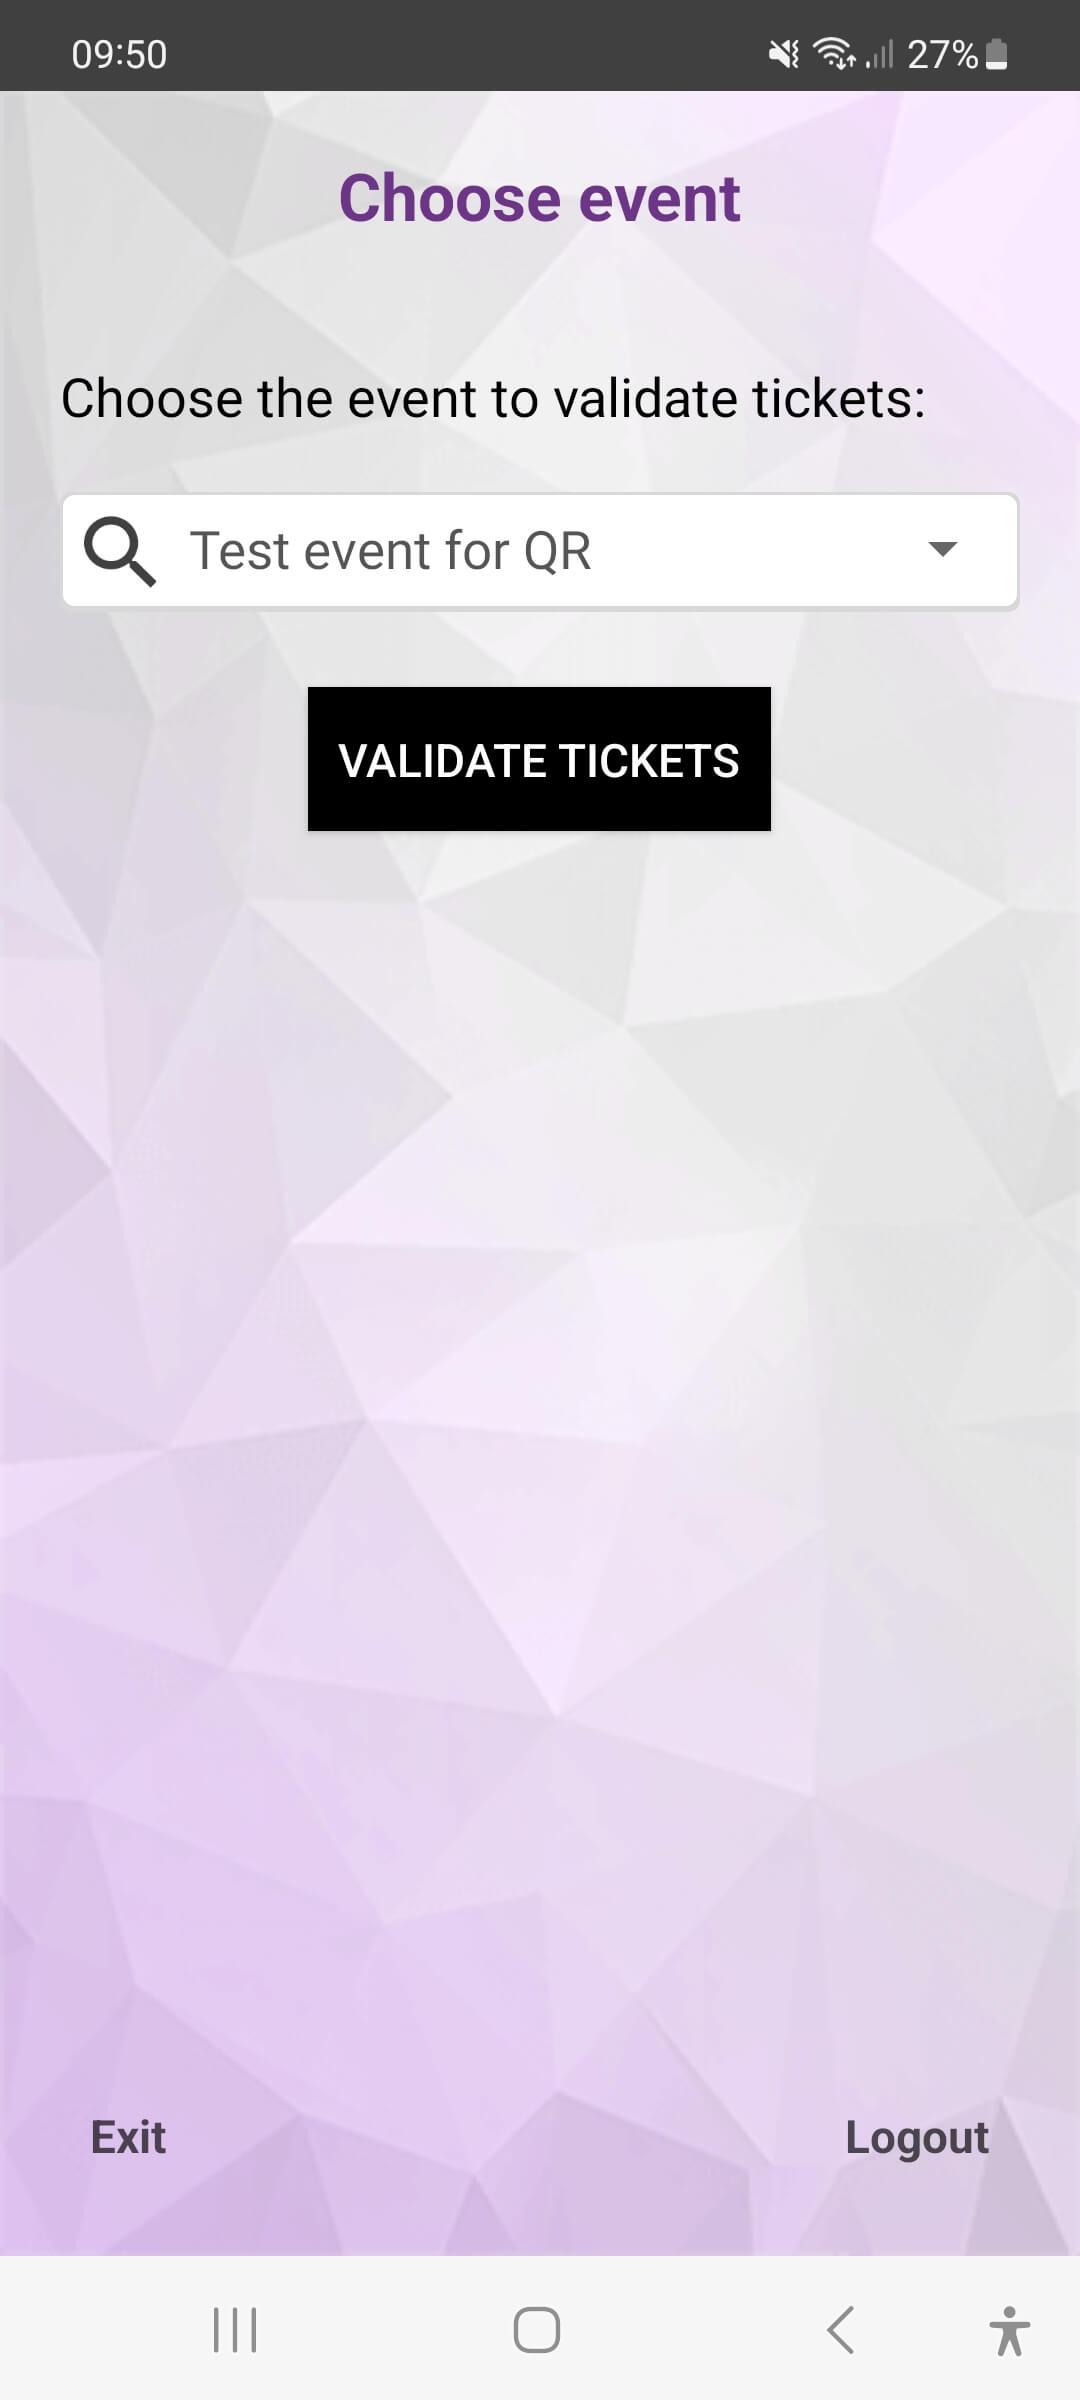
User identification is only necessary the first time the App is accessed. correct identification, a screen is presented from which the user will select the event from which they want to validate entries.
When clicking on "Exit" the user is asked and if he accepts, the App is closed without taking any additional action.
If clicking on "Logout" the user is asked and if you accept, the stored email is deleted, then returning to the login screen.
By clicking on "validate entries" you access the QR validation screen.
To validate an entry, simply place the QR code that appears on it in the framework of the scanner that the App presents.
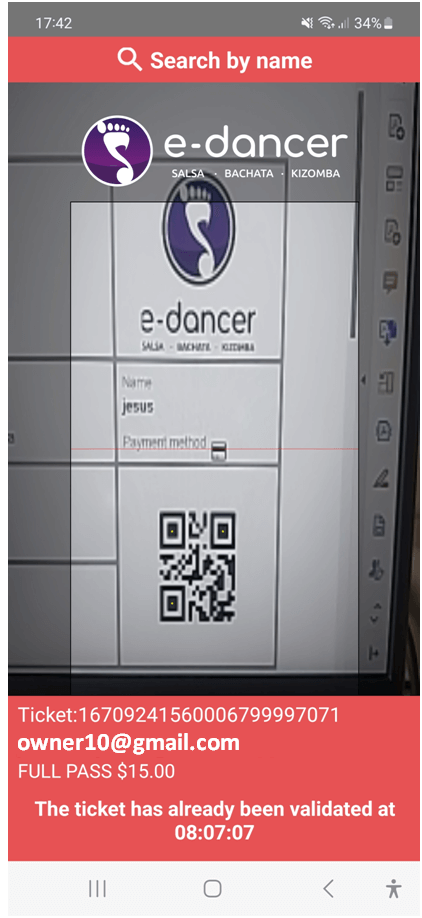
If the entry is valid and you have not yet been validated, the data associated with its owner and the corresponding product will be presented in green.
Otherwise, the same data will be presented but in red.
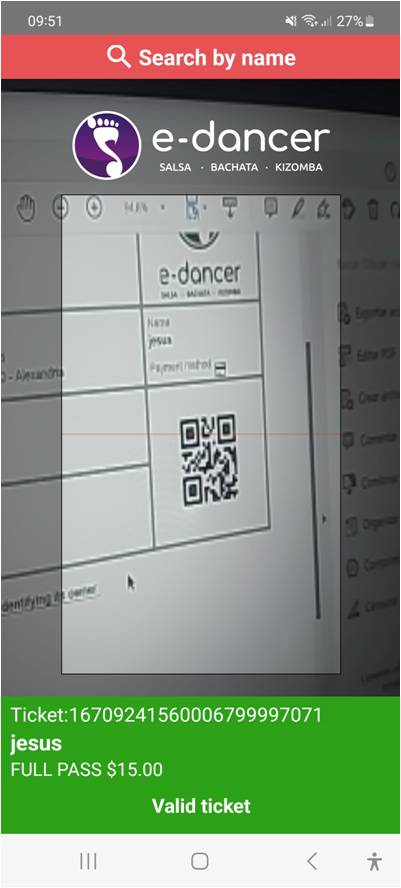
From the App it is also possible to search for a pass by name of the owner. To do this, the "Search by name" button is available at the top of the screen. Pressing it presents a screen that has the same functionality as that of check-in from the web page, but the search criteria are reduced to the name of the owner.
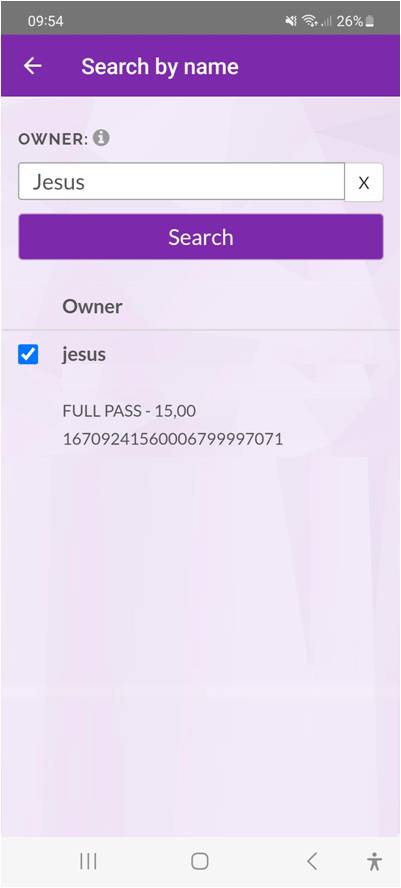
When searching for a name or part of it, the list of owners that comply with said filter is displayed.
You can "check" each one of them. Also, once validated, the "check" can be unchecked if it was made by mistake.
Once your event is finished, you can create a new edition of it from the data of the original event.
Click here to access the section where it is explained how to create an event as a copy of another.
e-dancer allows you to register the sales made at the box office on the day of the event. In this way it is possible, on the one hand, to have all the information on the sales made registered and, on the other, to register all the attendees to the event as contacts.
To do this, the platform has two functionalities:
MANAGEMENT OF BOX OFFICE MANAGERS
A organizer will always have box office management available. In addition, you can have one or more "box office managers", which are users those who have been authorized to manage the event box office (sell tickets at the door). Only an organizer of the event can manage authorized box office manager.
For this purpose, the “Box Office Managers” function is available, accessible from the event control panel. Selecting this function will display the list of users who can manage the box office; initially empty.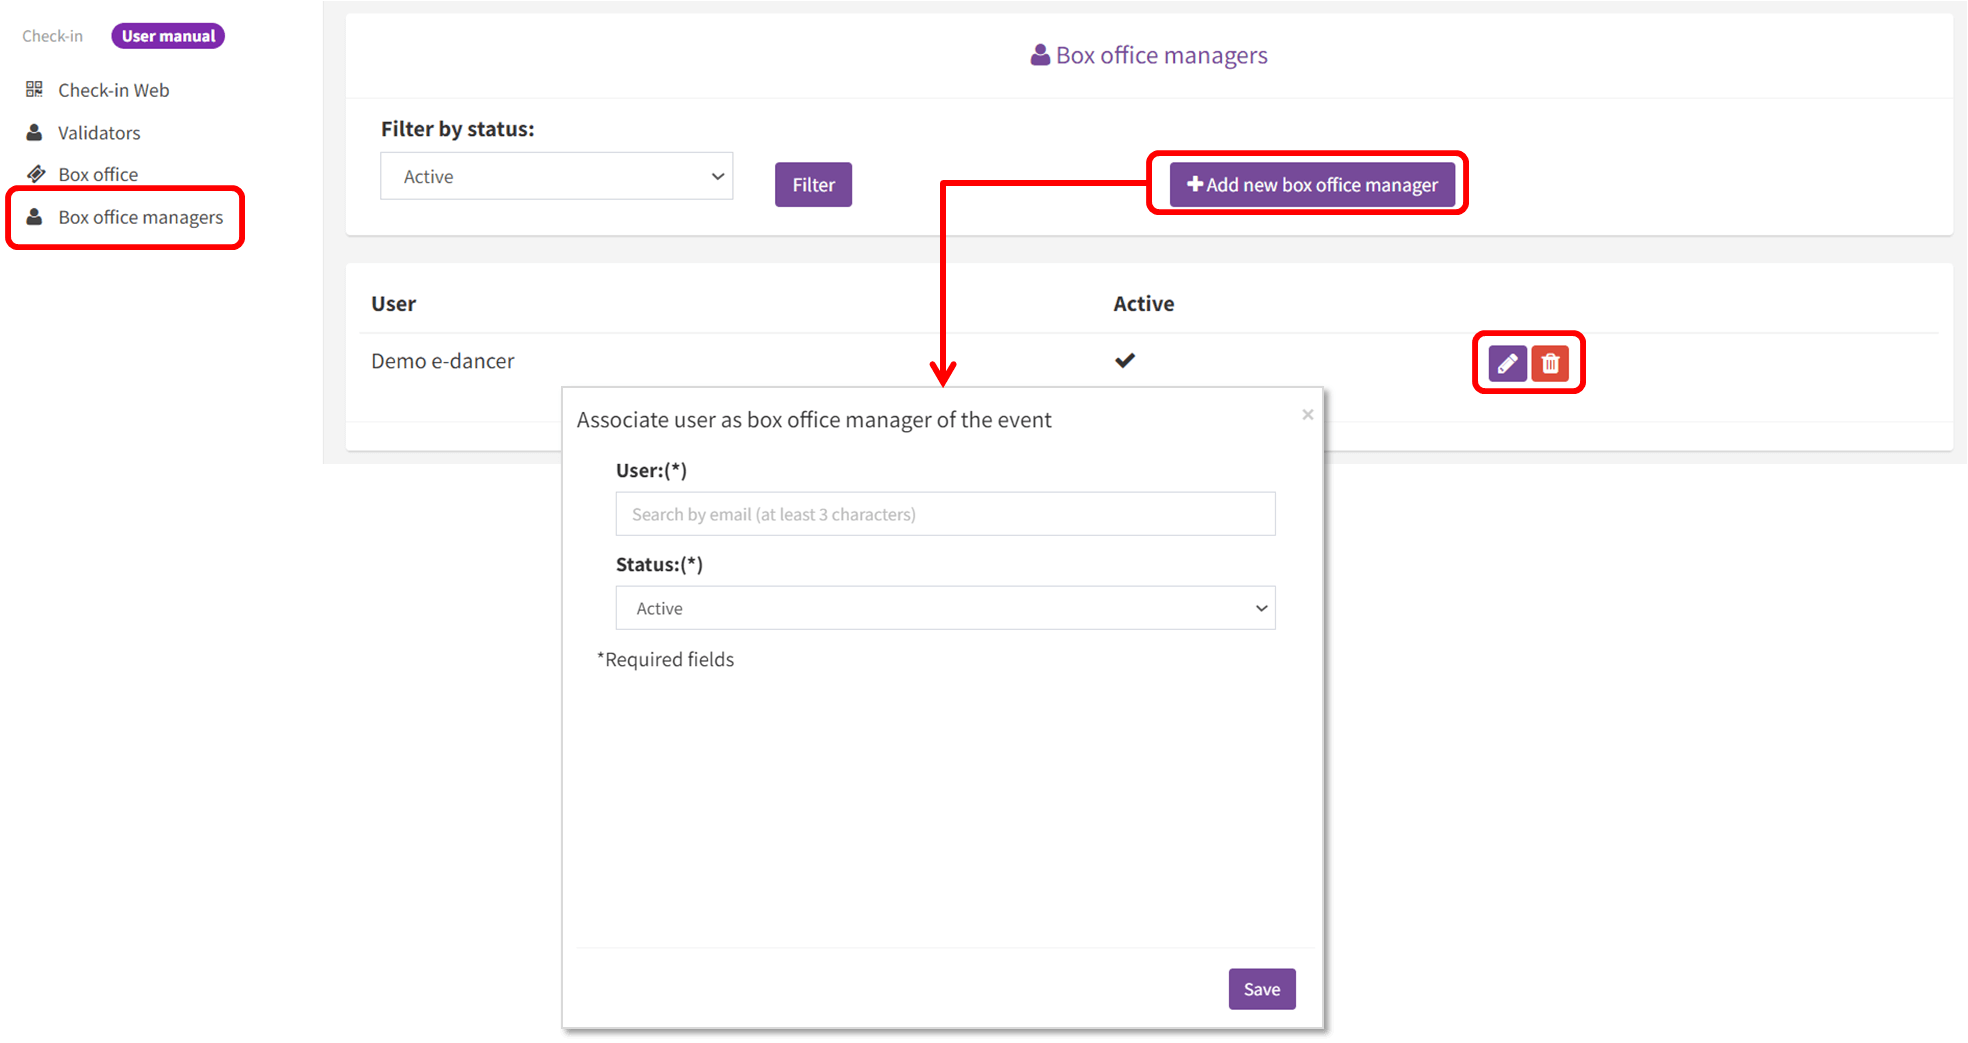
To add a new box office manager, it is necessary to be registered as a user in e-dancer. Using the "Add new box office manager" button, new users can be added to manage the event box office. Existing users can also be deleted (delete button) or deactivated (edit button).
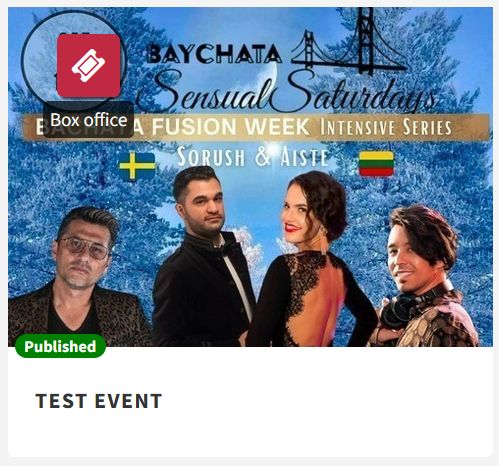
A box office manager can access box office management from the "My events" option in the "My profile" menu. By accessing this function this users will not have access to the rest of the event management features.
From the "Box office" option you can access a screen with the list of all the products currently on sale. For each of them there is a "BUY" button, which automatically registers the sale of the product at the box office. Below each product the number of sales at the box office is indicated.
For each product, in addition, there are 3 optional data: name, email of the buyer and offer or commercial code to apply.
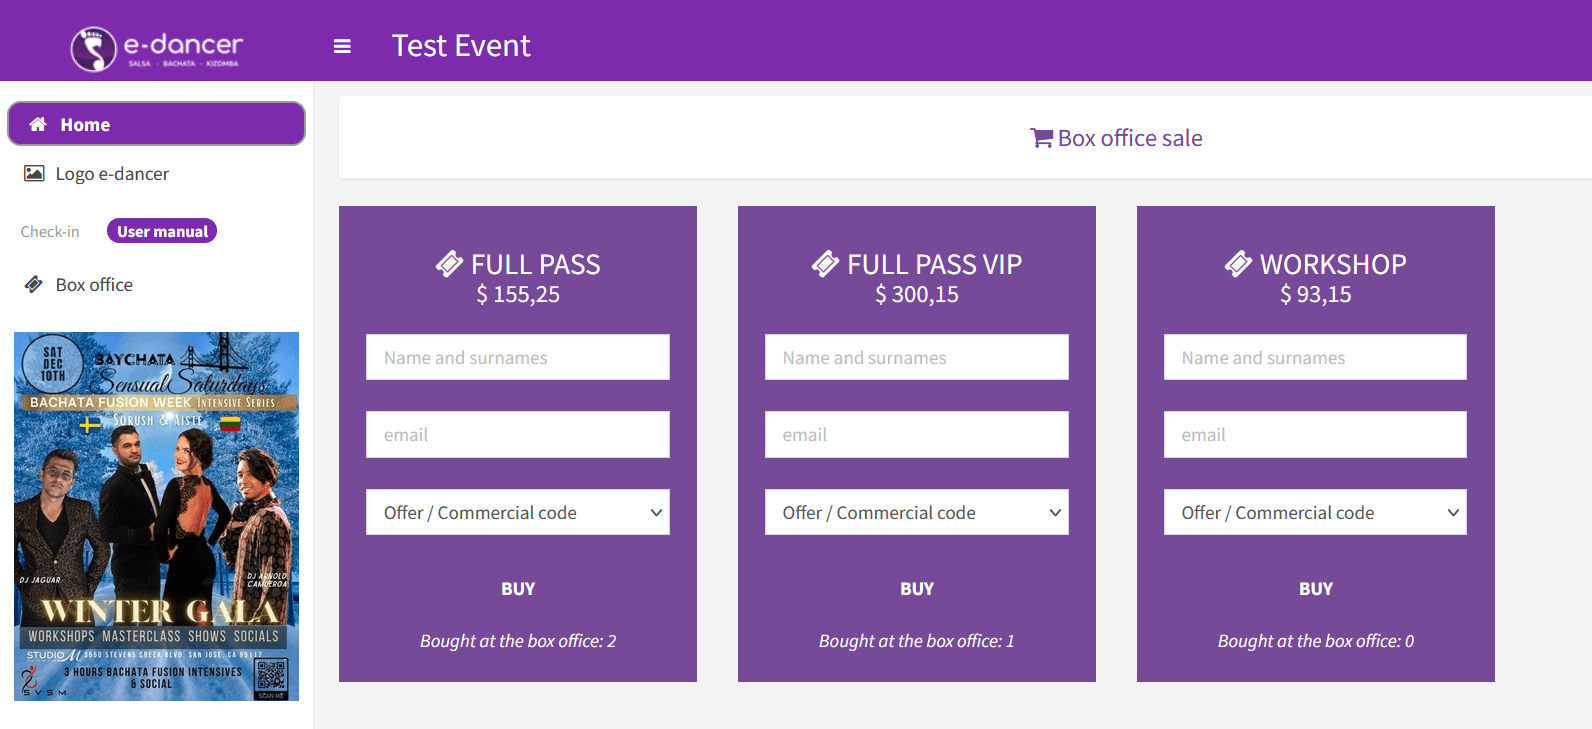
It is optional to enter the name and email of the buyer. They can be left blank, enter both data or just one of them. Although they are optional data, entering them provides contact information for upcoming events, so that those people who bought at the box office and provided their data can be included in a promotional mailing.
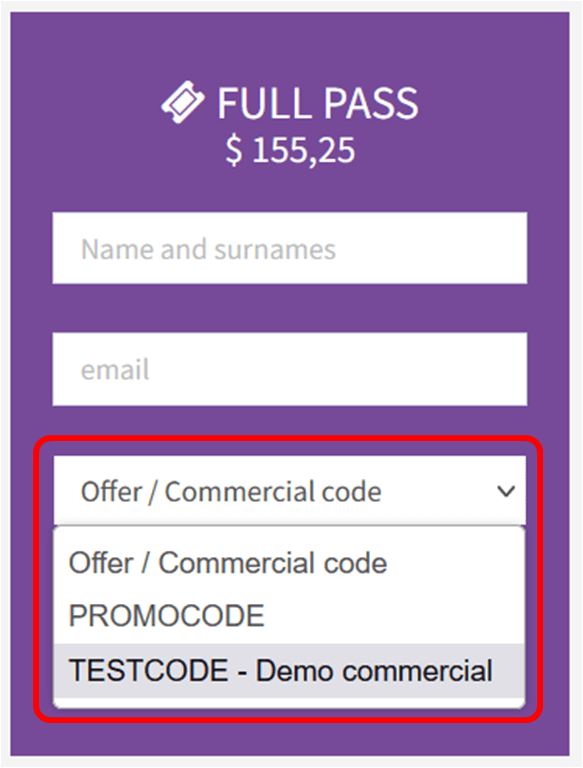
On the other hand, if offer codes or commercial codes have been defined for a product, one of the available ones can be selected (those applicable codes will be shown for each product).
In the list of codes, the commercial codes show the code itself and the name of the commercial; while an offer code is presented without further information.
When a code is selected, it will be applied, so that when you click on "BUY" the purchase of the product with the applied code will be registered. Said code may or may not imply a discount, depending on what has been defined in the "Offers and codes" functionality. In the case of assuming a discount, the price of the product will be updated showing the applied discount.
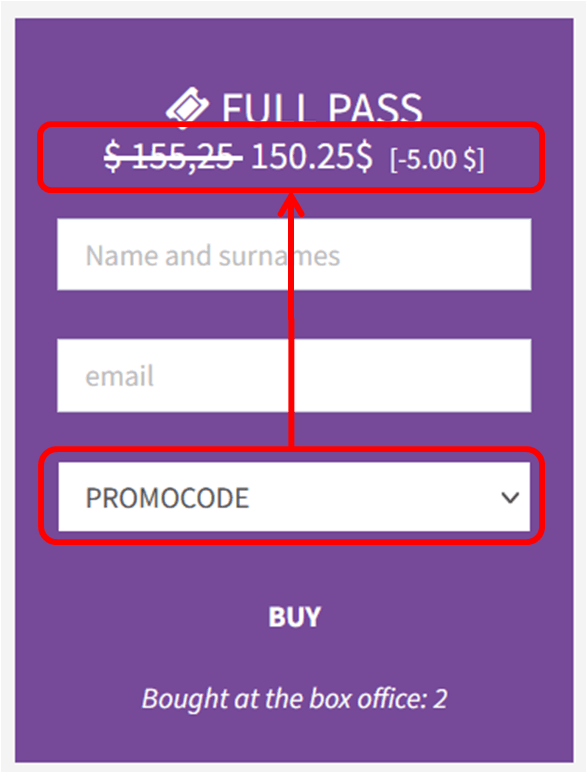
Once a purchase is registered with a selected code, said code is assigned to the purchase, applying a discount or not, in the same way as if the user had entered the code when making the purchase online. If the selected code is that of a commercial, in the "Commercials" functionality the purchase is assigned to it.
Only users who have purchased a ticket for your event on our platform can register a review. And said assessment can only be made once the event has ended, during the following 90 days after its completion.
The reviews of your event are publicly accessible and will be presented on our platform to all users who access it. However, the ratings can only be consulted once your event is over.
In the information of your current event it is possible to present the reviews of previous editions. To do this, it is necessary that when editing your event, in the "More information" section, select the previous edition of it. At that time, your event will be able to consult the reviews of previous editions.
As an organizer you have the "Ratings" option in the administration panel of your event. From there you will be able to consult the summary and detail of the valuations given for each of the editions of your event, as well as reply to those you think appropriate.
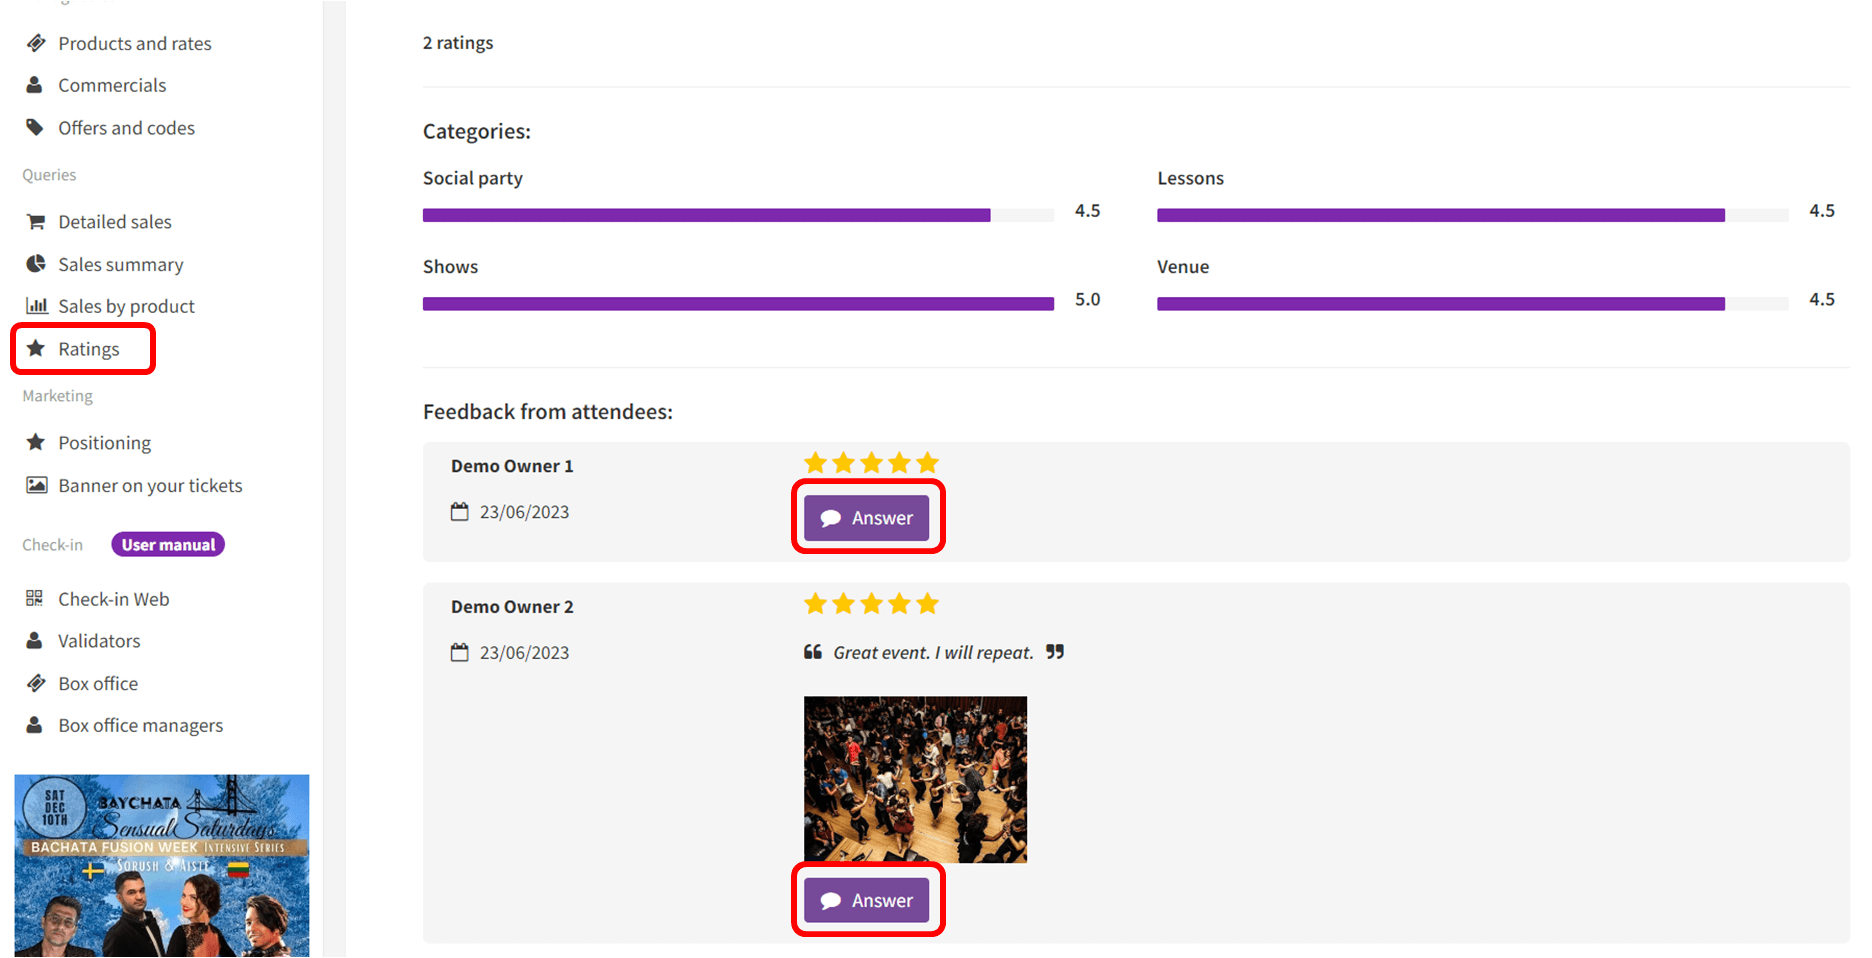
You will have very valuable information to be able to improve your event, broken down by categories and for each edition of the event.
On the other hand, at e-dancer we want to reward the events that are best valued by users. Therefore, the global assessment of each event will be a parameter that we will take into account when positioning it on our platform.
In the administration panel of your event you have the "Ratings" option. From it you can consult and reply to each of the reviews that have been registered for your event.
When an attendee registers a new review or updates an already registered one, you will receive a notification email. Likewise, when responding to a review, the user who registered it will receive an email informing them of it.